Showing posts with label MSCRM Developer Toolkit. Show all posts

Sunday, April 01, 2012

Why should you use CRM Developer Toolkit for your next CRM project engagment


[DISCLAIMER] This blog post contains strongly-opinionated information. For this reason, you are expected to use your judgement to decide whether the information is helpful for your development practice. As such, I make no warranties of any kind. [/DISCLAIMER]

Many of you are probably aware that I am a big fan of CRM Developer Toolkit. However, it is an unfortunate fact that the tool has not attracted enough attention in the community. Many of us are sceptical about using the toolkit with the concerns that the complexity or limitation of the tool might overweigh its benefits. This is reasonable for a new tool, and it is also expected.

With my limited experience with the toolkit, I have identified quite some important benefits when the tool is properly used. Here are some of them.

Unified Development Experience

The toolkit helps handle most day-to-day CRM development tasks. The toolkit supports the development of CRM web resources, Plugin, Silverlight, Workflow projects.

The toolkit provides a consistent approach for CRM development practice. Using the toolkit, you have one single Visual Studio solution to work with, which allows you to manage most (if not all) of CRM artifacts. The solution file include a CrmPackage project which is the container of CRM artifacts that you deploy and publish to CRM, including the source code of web resource files, references to plugin, workflow, Silverlight projects. If any of us have worked with SharePoint, you probably remember the days before its Visual Studio extension was available. If you asked 10 developers to do one single task for SharePoint, in most of cases, they would probably have done it in 9 different ways. It has been significantly better after the SharePoint extension became available. I believe CRM developer toolkit is an equivalent tool of the Visual Studio extension in SharePoint development practice, which has been widely embraced and welcomed by SharePoint community, and it has become part of Visual Studio shipment in VS 2010. I dare to say that nobody in SharePoint community wants to go back to the time without the extension. I would hope that the CRM developer toolkit can one day make into Visual Studio shipment as well, however I am very aware that we have a long way to go to get there.

Increased Development Productivity

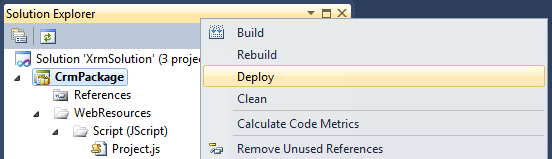
The toolkit significantly improves your development productivity. Working with CRM web resources can be a very tedious task if you do it from CRM user interface. The process is significantly simplified, if you are using the toolkit. You make the changes to the web resource within Visual Studio, then you right-click CrmPackage project, and choose "Deploy" menu, the websource is deployed to CRM. It is as simple as a snap. The only thing you need to do after this is, you have to publish the changes in order to see the changes in effect. What I usually do is to always leave a web page open, which has a "Publish All Customizations" button on it, so that it takes me one single click to have the deployed changes published in CRM. Since the toolkit supports most CRM development tasks, you rarely need to leave the environment. Also the toolkit has included a few other productivity tools including the capability to create a plugin class, and generate early bound entity classes from CRM Explorer, etc.

Managed Development Process

The toolkit manages your CRM web resources so that you can source control them. The toolkit allows you to manage your CRM web resources using file system within Visual Studio, each web resource is represented by one physical file in CrmPackage project. Such files can be easily version controlled using your favorite source control system. In the good CRM4 days, I have used some code snippet to load JavaScript from file system, so that I can version control my JavaScript files. This is totally unnecessary with the help of the develop toolkit in CRM2011 (also thanks to the Web Resource feature).

Advocate of Best Practices

The toolkit provides some guidelines for CRM development practice, and also it advocates some best practices when working with CRM. It has got a plugin project template in the Visual Studio solution for us to start with, which includes quite some informative comments.

Free of Charge

Last, but not the least, the toolkit is free, it comes with CRM SDK at no charge. ;-)


With all the above benefits using the toolkit, you should also be mindful about the constraints or limitations when using the tool. It is particularly important to know the boundary of the tool, and know what the tool can do, what it can't do or should  not be used. With the help of the toolkit, we, the developers, are really the director of the development. The tool has its own way to get the job done, it is up to us to leverage its flexibility to make our development life more enjoyable. After all, CRM is the final judge, the toolkit won't cover 100% of development scenarios, but there is usually some workaround when it comes to CRM platform, the primary value of the tool is to help streamline the process of working with CRM, so that we can be more productive.  Some in the community may say that the toolkit is just a CRM metadata browsing tool. This could be the case for the toolkit's CRM4 version, and it is definitely not the case for CRM 2011 developer toolkit, it is much more than a CRM metadata tool.

Although the toolkit is overall a great tool, it doesn't mean it is perfect. One important feature that is currently missing in the toolkit is the ability to deploy individual WebResource (CRM MVP Rhett Clinton and me both raised this as a feature request). I think this is an important feature to make the toolkit work better in a shared team development environment. For instance, if we have two developers using the same DEV environment, both of them are working on a different piece of web resource at a time. With the current version of toolkit, it will deploy the entire project when the Deploy command is used, so what would typically happen is, one developer will overwrite another developer's latest change. If we have the capability to deploy individual file, it will not cause this kind of trouble. Please vote for the change if you agree with me, so let the voice heard. Also there are also other areas that could make the toolkit better, if you have any other feature requests, I would encourage you to use Microsoft connect site to report them to Microsoft.

Thanks for reading.


Friday, December 16, 2011

MSCRM 2011: Two Errors When Using CRM Developer Toolkit to Deploy Workflow Library

While I was trying to develop a custom workflow library using CRM developer toolkit, I run into the following two errors (actually one at a time, but I am trying to keep the long story short).
Error registering plugins and/or workflows. A validation error occurred. The value of 'isolationmode' on record of type 'pluginassembly' is outside the valid range.
Error registering plugins and/or workflows. Description name must be specified
Parameter name: description
The solution is rather simple. What you need to do is to open RegisterFile.crmregister file (which is essentially an XML file) under CrmPackage project, and make some changes to the file in order to provide enough information for the deployment.
  1. Locate the Solution line of the workflow library in the XML file, add an XML attribute called IsolationMode, and give it a value of "None", so the XML attribute will be IsolationMode="None". 
  2. Located WorkflowType line, and add an XML attribute called Description, and give it a value which is meaningful. 
The following is the screen shot of the file before the change.

After the fixes, the file should look like this.
After you have made the above changes, you should be able to deploy your CRM workflow library in Visual Studio without problem.
Hope this helps if you ever run into the same issue.

Friday, December 02, 2011

MSCRM 2011: Filtered Lookup for "Add Existing..." Button of a CRM N:N View

I have previously documented a way to add lookup filtering capability to MSCRM4 "Add Existing..." button in a CRM N:N view. There was a question in the blog post today about whether this is possible in CRM 2011. So here is this blog post that will walk you through the implementation process.

Prerequisites

To go through the customizations in this blog post, you need to understand how CRM ribbon customization works, and also you need to know how to work with CRM Web Resources and solution export/import functionalities. It should also be noted that this blog post uses CRM Developer Toolkit. In case you are not familiar with the toolkit, you can have a look at my another blog post that illustrates some typical development scenarios which you might find useful. This blog post might be able to demonstrate you how the toolkit can help improve your productivity when developing CRM scripts.

Business Scenario

Let's say we have a custom entity called Project, which has a many-to-many relationship to CRM account entity. In Project entity form, I added a sub-grid which points to account entity, as shown below.


In the above screen, we have a Add Existing Button when the sub-grid is selected. When the button is clicked, we will be prompted the lookup entity's default Lookup View, as shown below.


What we are trying to achieve is to add some filtering capability to the "Add Existing ..." button so CRM only shows the account records that we are interested.

Let's get started.


Steps

Step 1: Create CRM JavaScript Web Resources

  1. In Visual Studio 2010, create a CRM project. (Please refer to the blog post that I just mentioned for detailed instructions about how to do this)
  2. In CrmPackage project, right-click WebResouces –> Script (JScript), and choose "Add" –> "New Item" to create a new JavaScript file. Let's call the file Project.js.


  3. Add the following script to the JS file (I borrowed the fetchXml and layoutXml combination from SDK document).
    function addExistingFromSubGridCustom(params) {
    
        var relName = params.gridControl.getParameter("relName"),
            roleOrd = params.gridControl.getParameter("roleOrd"),
            viewId = "{00000000-0000-0000-0000-000000000001}"; // a dummy view ID
        
        var customView = {
            fetchXml: params.fetchXml,
            id: viewId, 
            layoutXml: params.layoutXml,
            name: "Filtered Lookup View",
            recordType: params.gridTypeCode,
            Type: 0
        };
    
        var lookupItems = LookupObjects(null, "multi", params.gridTypeCode, 0, null, "", null, null, null, null, null, null, viewId, [customView]);
        if (lookupItems && lookupItems.items.length > 0) {
            AssociateObjects(crmFormSubmit.crmFormSubmitObjectType.value, crmFormSubmit.crmFormSubmitId.value, params.gridTypeCode, lookupItems, IsNull(roleOrd) || roleOrd == 2, "", relName);
        }
    }
    
    function addExistingFromSubGridAccount(gridTypeCode, gridControl) {
        addExistingFromSubGridCustom({
            gridTypeCode: gridTypeCode,
            gridControl: gridControl,
            fetchXml: "<fetch version='1.0' " +
                           "output-format='xml-platform' " +
                           "mapping='logical'>" +
                       "<entity name='account'>" +
                       "<attribute name='name' />" +
                       "<attribute name='address1_city' />" +
                       "<order attribute='name' " +
                               "descending='false' />" +
                       "<filter type='and'>" +
                           "<condition attribute='ownerid' " +
                                       "operator='eq-userid' />" +
                           "<condition attribute='statecode' " +
                                       "operator='eq' " +
                                       "value='0' />" +
                       "</filter>" +
                       "<attribute name='primarycontactid' />" +
                       "<attribute name='telephone1' />" +
                       "<attribute name='accountid' />" +
                       "<link-entity alias='accountprimarycontactidcontactcontactid' " +
                                       "name='contact' " +
                                       "from='contactid' " +
                                       "to='primarycontactid' " +
                                       "link-type='outer' " +
                                       "visible='false'>" +
                           "<attribute name='emailaddress1' />" +
                       "</link-entity>" +
                       "</entity>" +
                   "</fetch>",
            layoutXml: "<grid name='resultset' " +
                                 "object='1' " +
                                 "jump='name' " +
                                 "select='1' " +
                                 "icon='1' " +
                                 "preview='1'>" +
                             "<row name='result' " +
                                  "id='accountid'>" +
                               "<cell name='name' " +
                                     "width='300' />" +
                               "<cell name='telephone1' " +
                                     "width='100' />" +
                               "<cell name='address1_city' " +
                                     "width='100' />" +
                               "<cell name='primarycontactid' " +
                                     "width='150' />" +
                               "<cell name='accountprimarycontactidcontactcontactid.emailaddress1' " +
                                     "width='150' " +
                                     "disableSorting='1' />" +
                             "</row>" +
                           "</grid>"
    
        });
    }
  4. After the script has been saved, you can right click CrmPackage project in Visual Studio Solution Explorer window, and choose "Deploy" to deploy the script to CRM Server. In our case, we will have a Web Resource in CRM called new_Project.

Step 2: Customize CRM Ribbon to Hook up the JS Function

  1. In CRM, create a new solution, and add account entity (the entity in the sub-grid) to the solution.
  2. Export the solution to a .zip file, and extract the file somewhere in your local file system.
  3. Open the customizations.xml from the extracted file, and locate RibbonDiffXml section in the file, under the account entity.


          <RibbonDiffXml>
            <CustomActions />
            <Templates>
              <RibbonTemplates Id="Mscrm.Templates"></RibbonTemplates>
            </Templates>
            <CommandDefinitions />
            <RuleDefinitions>
              <TabDisplayRules />
              <DisplayRules />
              <EnableRules />
            </RuleDefinitions>
            <LocLabels />
          </RibbonDiffXml>
  4. What we need to change is the CommandDefinitions part, which we can get the template code from applicationribbon.xml file (or <entityname>ribbon.xml if it's a system entity) in CRM SDK's resources\exportedribbonxml folder. 
  5. In applicationribbon.xml file (or <entityname>ribbon.xml), locate <CommandDefinition Id="Mscrm.AddExistingRecordFromSubGridAssociated"> line (You can search by addExistingFromSubGridAssociated to get there).
  6. Copy the xml content under <CommandDefinition Id="Mscrm.AddExistingRecordFromSubGridAssociated"> (including itself and its closing tag as well) to the customizations.xml file, so it should look like this.
  7. Modify the JavaScriptFunction part to point to the custom JS function that we previously developed, so it should be something like this:


    The following is the final customization xml.
      <CommandDefinition Id="Mscrm.AddExistingRecordFromSubGridAssociated">
        <EnableRules>
          <EnableRule Id="Mscrm.AppendPrimary" />
          <EnableRule Id="Mscrm.AppendToPrimary" />
          <EnableRule Id="Mscrm.EntityFormIsEnabled" />
        </EnableRules>
        <DisplayRules>
          <DisplayRule Id="Mscrm.AddExisting" />
          <DisplayRule Id="Mscrm.ShowForManyToManyGrids" />
          <DisplayRule Id="Mscrm.AppendPrimary" />
          <DisplayRule Id="Mscrm.AppendToPrimary" />
          <DisplayRule Id="Mscrm.AppendSelected" />
          <DisplayRule Id="Mscrm.AppendToSelected" />
          <DisplayRule Id="Mscrm.CanWriteSelected" />
        </DisplayRules>
        <Actions>
          <JavaScriptFunction FunctionName="addExistingFromSubGridAccount" Library="$webresource:new_Project">
            <CrmParameter Value="SelectedEntityTypeCode" />
            <CrmParameter Value="SelectedControl" />
          </JavaScriptFunction>
        </Actions>
      </CommandDefinition>
    Note that your JS webresource name could be in different format. You can find out that by openning the web resource in CRM, which tells you the path to the web resource file.

  8. Save the file, and zip it back to the original solution export file.
  9. Import the solution file, and publish changes. If everything goes OK, you will see a filtered lookup like the following.

Final Notes

  1. This is an unsupported customization, since we are using undocumented CRM built-in JS functions.
  2. addExistingFromSubGridCustom function is a re-usable function which is what you really need. addExistingFromSubGridAccount function is the actual one that's going to be called in your ribbon command button's customization.
  3. The filter that I have implemented didn't use any context information (such a field value) on the CRM form, you can easily add this in the function when constructing the fetchXml string, if desired.
  4. The above change will apply to all account subgrid regardless of the hosting entity. It should be possible to handle it differently by getting some context information from the form, or probably pass some extra information to the function.
  5. The code didn't have much comments, but hopefully the sample has provided enough information for you to start with.
By the way, an off-topic note, this blog has just reached 100K page views today. It took almost two years to reach 50K pageviews last time, but it only takes a few months to reach another one, although I don't currently produce as many posts as I did in the beginning of my blogging adventure. Good to see the growth of the CRM community.

Hope this helps.

Wednesday, October 26, 2011

CRM Developer Toolkit is Now Officially v1.0

Along with the latest version of CRM SDK (v5.0.7) released today, Microsoft Dynamics CRM team has released the first official version of CRM Developer Toolkit.

After a rough 10 minutes play, I haven't noticed much difference from the beta version that was released about 3 months ago. But one nice thing is now we can use integrated authentication when connecting to CRM server.
[UPDATE - Nov 2, 2011] According to CRM SDK team,one significant change from the beta developer toolkit is the XAML workflow activity project type.
CRM Developer Toolkit - Connection
The toolkit is accompanied by a readme file, which you should check out. It described some common issues when working with the toolkit. Here are some of the issues that you may encounter and the workarounds that are currently available (Some typos were fixed from the original file).
Visual Basic .NET is not supported (131574)
The Developer Toolkit does not support VB.NET.

No upgrade path for projects created with the Microsoft Dynamics CRM 4.0 Developers Toolkit (121629)
The Microsoft Dynamics CRM Developer’s Toolkit for CRM 4.0, which provided a sample project and integration with Visual Studio, was released in April 2009 on MSDN Code Gallery.
The Developer Toolkit for CRM 2011 has been completely re-written to support native Visual Studio development practices and project templates, to be less dependent on MSBuild, and to improve deployment support for new Microsoft Dynamics CRM development paradigms, including Microsoft Dynamics CRM Solutions and Web Resources.

Sporadic "Object Reference not set to an instance of an object" errors when using the CRM Explorer (138780)
Issue: When using the CRM Explorer "Object Reference not set to an instance of an object" errors occur sporadically.
Workaround: If you encounter this error while performing an operation, refresh the organization tree and try the operation again.

Invalid Project templates for CRM WorkflowLibrary (138374)
Issue: After installing the CRM Developer Toolkit, when you create a new project, below the Installed Templates for Visual C# you will see a CRM Workflow Library group containing a number of CRM Workflow Library project templates.

Workaround: Do not use these project templates.

When an error occurs while deploying a solution, other solution components will not be deployed. (126277)
Any solution components deployed before the error occurs will succeed and will not be rolled back after the error occurs. Any solution components that were not deployed before the error will not be deployed.

Solution components are added to default solution, if specified unmanaged solution is deleted. (126536)
If you configure your Visual Studio solution to connect to a specific unmanaged solution and that solution is later deleted, the solution components will still be deployed to the default solution.

The RegisterFile.crmregister must be manually edited after a generated class is deleted (139890)
Issue: If you attempt to deploy a solution after deleting a class generated for a plugin or workflow you will see the following error:
Error registering plugins and/or workflows. Plug-in assembly does not contain the required types or assembly content cannot be updated. 
Workaround: Open the RegisterFile.crmregister file to remove the <Plugin>,<WorkflowType>, or <XamlWorkflowType> node where the TypeName attribute specifies the fully qualified name of the class that was deleted.

Invalid error message following any other error when adding a web resource (135124)
When a validation error occurs due to a problem adding a web resource the following error message will follow it:
The selected file is not a valid type of web resource 
For example, when adding a web resource with the same name as an existing web resource you will get the expected error "A file with this name already exists. Please give it a unique name." but after clicking OK to close that error you will also get the invalid error incorrectly indicating that the file is not a valid type of web resource.

RegisterSchema.xsd uses enumeration values for specifying the stage of a plug-in step that are inconsistent or misleading. (136101)
Issue: For the <Step> elements within the RegisterFile.crmregister the enumeration defining valid values used by the Stage attribute do not match those used by the Plugin Registration Tool. The following table shows how the equivilent values used in the Plugin Registration tool:

RegisterFile.crmregister values Plugin Registration Tool values
PreOutsideTransaction PreValidation
PreInsideTransaction PreOperation
PostOutsideTransaction PostOperation

The enumeration value PostOutsideTransaction is misleading. PostInsideTransaction would be a more accurate because this represents Stage 40. See Event Execution Pipeline : Pipeline Stages for more information.

Duplicate file extensions added when existing web resources are added to project(138384)
Issue: When adding web resources from another solution to the current project in the Developer Toolkit using the Add to Packaging Project command in the CRM Explorer, the web resource files are added to the packaging project and a corresponding file extension is added to the name of the file. For example, an existing web resource named filename.js will be filename.js.js. This has no effect on the behavior of the web resource because the unique name used by the web resource is not necessarily the same as the file name.

Workaround: You can re-name the file used in the packaging project to remove the duplicate file extension.

Error building solution that includes XAML Workflow projects (139788)
Issue: By default the reference to System.Runtime.Serialization is not included in XAML Workflow projects. If you do not add this reference an error will occur when you attempt to build the project.

Workaround: Add a reference to System.Runtime.Serialization to any XAML Workflow projects you add.

Solutions drop-down displays managed solutions (136003)
Issue: When you connect to the Microsoft CRM Server and select and organization you have the option to select a solution. The solutions listed may include managed solutions. If you choose a managed solution when you later try to deploy your solution the following error may occur:

Error registering plugins and/or workflows. The PluginAssembly entity or component has attempted to transition from an invalid state: ComponentStateName: None; ComponentOperation: Create; ComponentSolutionType: Solution; SolutionOperationContext: None; IsProtected: True; IsBeingPublished: True.

Workaround: When you choose a solution be sure to choose an unmanaged solution.
It should be noted that the help file is now part of the entire SDK .chm file.

I have previously blogged about some typical development scenarios using the toolkit, you may want to check out if you are interested.

Hope this helps.

Friday, September 09, 2011

Switching CRM Developer Toolkit's Target Environment

It's often the case in our CRM development life that we have the need to change the target development environment from one server to another. Working with the CRM 2011 Developer Toolkit, we can appreciate the productivity that we have gained from the toolkit. However, there wasn't any documentation about how to easily switch target environment using the toolkit.

Here are some little tips that I learned from CRM Development Forum today, that can be used to do so without too much hassles. You can use either one of the following to achieve this.
  1. In Visual Studio's Tools menu, there is a menu item called "Connect to Dynamics CRM Server…". You can simply click it in order to launch CRM connection window where you can enter new connection information to be used to connect to a different server or a different CRM organization.
    image
  2. Delete .suo file from the same folder where your Visual Studio solution file (.sln) resides. After you have done so, the next time you fire up Visual Studio and open the CRM solution again, you will be prompted to enter CRM connection information. What this implies is, the CRM connection settings (including the login credentials) are stored in the .suo file. 
Before knowing the above tricks, I actually raised this as an issue at Microsoft Connect site. To be very honest with you, I tried a number of wild ways to find out how the CRM connection settings are stored and how they can be changed, I did Windows registry search, and I looked into Windows file system for any suspicious activities, nothing led me to a concrete solution. I even came up an idea to stop IIS service in order to fail the connection that Visual Studio is attempting to make, so that it will prompt you to enter new connection settings after the connection fails. I have never thought of .suo file, neither have I ever looked for such options in the Tools menu of Visual Studio!

Knowing the fact that your CRM login credentials are stored in the .suo file, you should be careful when you want to share the file with others. It should also be noted, many developers tend to check-in all files under the Visual Studio solution folder to source control system, including the .suo file. Those of them should be warned or cautioned. Sending .suo file to others and storing it in source control repository should be avoided for security reason.

The tips came from Phil Hand, credit goes to him.

Hope this helps.

Friday, July 29, 2011

MSCRM 2011 Developer Toolkit Walkthrough

As you may have noticed that MSCRM team has released a new version of SDK (v5.0.5) today. The SDK includes a full functioning Developer Toolkit, which, IMHO, marks a significant milestone in CRM development practice. For the first time, the CRM development community has a first-class solution template within Visual Studio. Using the solution template, we can create, develop and deploy CRM Plug-ins, custom workflows, and web resources without having to leave the Visual Studio environment. The toolkit is designed to be a set of integrated tools within Visual Studio which help improve development productivity for Microsoft Dynamics CRM 2011 and Microsoft Dynamics CRM Online.

This blog post will walk you through some typical CRM development scenarios, which I hope can help you become familiar with the new toolkit, so that you can take full advantage of it.

Prerequisites

The Developer Toolkit requires the following components

Installation of the Toolkit

The installation package of the toolkit can be found in the SDK download package at SDK\Tools\DeveloperToolkit. Double click "CrmDeveloperTools_Installer.msi" to install the toolkit.
Note: If you happen to have a previous version of the toolkit installed, you need to uninstall it first before installing the new version.

Note: The Developer Toolkit does not support Visual Basic .NET. If you happen to be a VB.NET developer, you will have to think about switching to C#. I doubt there is any plan to release VB.NET version of the toolkit anytime soon.

Create a New CRM Solution

To create a new CRM solution using the solution template provided by the toolkit, please follow the procedures below.
  1. Within Visual Studio 2010, click File –> New –> Project menu.
  2. In the "New Project" window, navigate to "Dynamics CRM" under "Visual C#", and choose "New Visual Studio Solution Template for Dynamics CRM 2011", and enter a solution name before click "OK" button. 
    0 - New CRM Solution Template
  3. You will be prompted to enter CRM server connection information as shown below. Provide the name of your CRM server, and click "Connect" button. 
    1 - Enter CRM Discovery Server Name and Connect
  4. Then you will need to provide authentication information in order to connect to the CRM discovery server. After you have done so, you can click "Log on" button. 
    2 - Enter Authentication Details to Log on
  5. You will now be asked to choose a CRM organization and a solution that you would like to work on. After you have provided all information required, you may click "OK" button now. 
    3 - Pick Organization and Solution Name
  6. By default, the CRM solution template will create a Silverlight project, and a companion web project for you. Enter the Silverlight web project name and click "OK" button to continue. 
    4 - Create New Silverlight Application by Specifying the Application Name
    Note: You may not necessarily need Silverlight project in your CRM solution, but you should simply provide a Silverlight web project name in order to make the solution template wizard happy so that it can finish its own job. You can later delete the Silverlight projects if you don't actually need them.

    Note:
    If you don't currently have Silverlight Developer toolkit installed on your computer, you will be prompted the following window. 
    4 - Silverlight Developer runtime required for CRM Developer Toolkit
  7. If everything goes fine, you will see a screen of Visual Studio as shown below. Notice that the wizard has created a Visual Studio solution which consists of a few projects, including:
    Project Role in Solution
    CrmPackage The manifest project that that contains all assets to be deployed to Microsoft Dynamics CRM, combined with their deployment settings
    Note: You should never delete this project in your CRM solution.
    Plugins The Plugins project contains a base class named Plugin. All plug-in classes generated through the Create Plug-in option of the CRM Explorer will derive from this class. This class simplifies some of the plumbing code that's required by many plug-ins.
    SilverlightApplication A sample Silverlight project that can be used as the starting point to develop your Silverlight web resource.
    SilverlightApplication.Web A companion web project that host the above Silverlight project, and can be used to test the Silverlight project.
    Workflow The Workflow project provides support for implementing custom workflow activities to be used for your on-premises Microsoft Dynamics CRM instance.
    Note: Microsoft Dynamics CRM Online does not currently support Custom workflow libraries, so you may delete this project if you are working for Microsoft Dynamics CRM Online.
    5 - Generated New CRM Solution
    Note: In the above screen, you can see a new window called "CRM Explorer", which I will explain in details next.
  8. Once the CRM solution has been created, the first thing you should do is to sign both your Plugins and Workflow projects with a strong name key file. You may sign your projects with a new key file or an existing one if you already have. 
    6 - Sign CRM Plug-in and Workflow Projects with Strong Name File

Use of "CRM Explorer" Window

CRM Explorer is a very useful window that's designed to help you navigate through any customizable components on your CRM server in an organized fashion.
6 - CRM Explorer
As shown above, CRM Explorer presents you a tree window that you can use mouse click to navigate through the solution components that you are interested in. The following is a screen that shows how it looks like when it has been expanded (I truncated some entities in the screen to make it concise).
8 - Expanded CRM Explorer
In addition to the navigation features, CRM Explorer allows you to open the CRM solution component in Visual Studio browser when you double click the item. The following screen shows how it looks like when you double click a CRM entity (Account entity in this case) in the explorer.
11 - Open CRM Customization Page in Visual Studio
Another great feature offered by CRM Explorer is, you can perform certain tasks by using context menu commands when you right-click on a specific item. The following is a list of some typical scenarios that you would use the right click commands in CRM Explorer.
  1. Generate CRM Service Proxy Classes
    Context Entities
    Command Generate Wrapper
    Description Executes CrmSvcUtil.exe to generate the strongly typed proxy classes. If you only have one plug-in project, this class will automatically be added to this project; otherwise, the Generate Entity Wrappers dialog box will allow you to choose which Project to create the classes in.
    Steps
    • Right click on "Entities" node in CRM Explorer window
      13 - Generate CRM Service Proxy Classes in CRM Explorer
    • Choose which project that you want the proxy classes to reside in
      14 - Choose which Project the CRM Service Proxy Classes Reside In
    • Wait until it finishes generating the proxy classes, this could take a few minutes depending on the complexity of your customizations and your hardware configuration.
      15 - Generating CRM Service Proxy Classes
    • The following is a screen of the generated code. 
      16 - Generated CRM Service Proxy Classes
  2. Create Plugin for CRM entities
    Context Entities –> Specific Entity
    Command Create Plugin
    Description Opens the Create Plug-in dialog with the Primary Entity set to the selected entity.
    Steps
    • Right click a specific entity that you would like to create a plug-in, and choose "Create Plug-in" from the command menu
       16 - Generate CRM Plug-in in CRM Explorer
    • Specify the details of the CRM Plugin 
      17 - Create CRM Plug-in
    • Once the plugin code has been generated, you can see that the new plugin class inherits from the base Plugin class
      18 - Generated CRM Plug-in
  3. Add Web Resource items from CRM Server to the packaging project
    Context Web Resources  or Web Resources -> Web Resource Type   or
    Web Resources -> Web Resource Type –> Specific Web Resource
    Command Add to packaging project
    Description Add selected web resources from the CRM organization to the CrmPackage project.
    Steps
    • Right click specific web resource item, a web resource type, or the Web Resources folder, and choose "Add to packaging project" from the command menu 
      9 - Add Web Resources to CRM packaging project 
    • You should be able to see the selected web resources added to your CrmPackage project, from there you can work with the CRM Web Resources just like any other source code files.  
      10 - Added Web Resources 
  4. Add, Edit, Delete Plugin  
    Context Plug-in Assemblies -> Specific Assembly   or
    Plug-in Assemblies -> Specific Assembly -> Specific Plugin
    Command Add Plugin Edit Plugin Delete Plugin
    Description Add, edit or delete CRM plugins.
    21 - Add plugin in CRM Explorer
    22 - Edit, delete plugin in CRM Explorer
  5. Add, Edit, Delete Plugin Steps  
    Context Plug-in Assemblies -> Specific Assembly -> Specific Plugin   or
    Plug-in Assemblies -> Specific Assembly -> Specific Plugin -> Specific Step
    Command
    Add Step
    Edit Step
    Delete Step
    Description Add, edit or delete CRM plugin steps.
    23 - Edit plugin step in CRM Explorer

Use of "CrmPackage" Project in "Solution Explorer" Window

CrmPackage project is a specially engineered Visual Studio project template designed to manage all CRM solution components within a single place.
  1. Manage CRM Web Resource Metadata Attributes CRM Web Resource has certain metadata attributes associated, which dictate how the web resource items can be accessed and managed in CRM system. To change a web resource item's metadata attributes, you can click any particular web resource item in Solution Explorer window to open its Properties window, where you can change or update any properties as necessary. 
    19 - Manage Web Resource Properties
  2. Manage Silverlight Web Resource Metadata Attributes Silverlight web resource is a special web resource type which is added to CrmPackage project through project reference. In order to change Silverlight web resource's metadata attributes, you need to expand CrmPackage project's References node, and click on the particular reference item, so that you can change or update any metadata attributes in Properties window as needed. 
    20 - Manage Silverlight Web Resource Properties
Note: The above two approaches are particularly useful if you have any source code files that are not currently managed by CRM Server yet, but you want to publish them to CRM Server, in which case, you can use Visual Studio's Add Existing Items command to add them to CrmPackage project, then you would provide necessary metadata attributes before you can actually deploy them to CRM server.

Publish Changes to CRM Server

After you have done all the good hard work on your CRM solution, you are ready to publish your changes back to CRM Server. The CRM Solution template has made this significantly easy, you can right-click the CrmPackage project, and choose "Deploy" from the command menu, all the changes will be published to CRM Server after all referenced projects have been successfully compiled.
24 - Deploy CrmPackage
Note: You need to make sure that you have signed all plugin and workflow projects in order for Visual Studio to be able to publish them to CRM Server.

I have tried to cover some most common development scenarios using the toolkit in this blog post, but I am sure that there are many other things that I haven't covered, which you can explorer by reading the user guide document that you can find from the SDK.

Note that the toolkit is currently a beta version. I have encountered a few minor issues when using it. Overall, it's a great productivity tool for CRM development. Great job by the CRM team.

Please let me know if there are any errors or typos in this post.

Hope this helps. Cheers!