Scenario Summary
There is no doubt that data quality is important in business applications. High-quality data is critical to the efficiency of business operations.
Using Microsoft Dynamics CRM as your business application platform, it is a challenge to implement data quality solution that's both efficient and cost-effective.
In SQL Server 2012, Microsoft introduced Data Quality Services (DQS) which enables database or IT professionals to manage business data quality and ensure the data is suited for its business usage.
In this blog post, we are going to leverage Microsoft Data Quality Services (DQS) to implement data quality solutions for Microsoft Dynamics CRM applications using SSIS Integration Toolkit.
For illustration purpose, we have the following CRM account records in the system that we want to process. You may have noticed that the State/Province field is filled with data of many different formats, which is the problem we want to fix, our goal is to update the field by converting its value to the standard two-letter state code, such as CA for California, WA for Washington, and so on. This is just a very simple sample for demo purpose, your business requirement of data quality solution could be more complex.

Prerequisites
You need to have a system that has the following components installed.- Business Intelligence Development Studio component from SQL Server 2012
- A server with SQL Server DQS installed (The DQS server can be installed on SQL Server itself it is a development environment, for production purpose, your DQS server might reside on a different box)
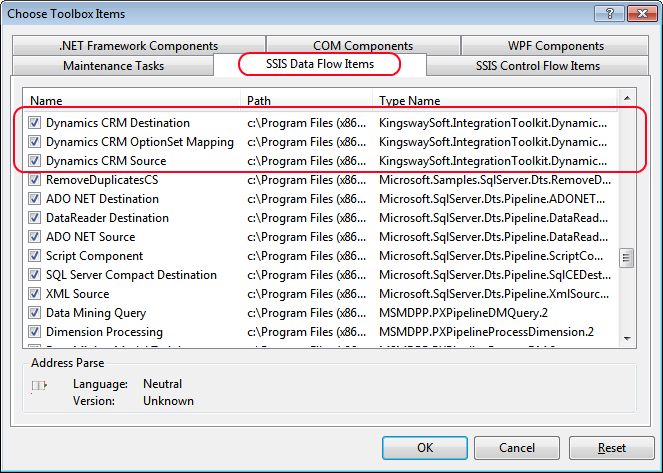
- SSIS Integration Toolkit for Microsoft Dynamics CRM
- Windows Identity Foundation
NOTE: It is not necessarily the case that DQS is the only way to implement data quality solution. Without SQL Server 2012, you can still use a combination of SSIS transformation components to implement data quality solution in SSIS. However, using Microsoft Data Quality Services provides a number of benefits, which is the reason that we are using it in this blog post.
Developing SSIS Data Flow
- First, you would launch Business Intelligence Development Studio to create a new SSIS project, and then create a new SSIS package within the project.
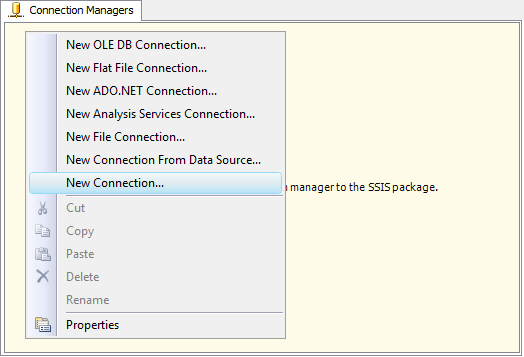
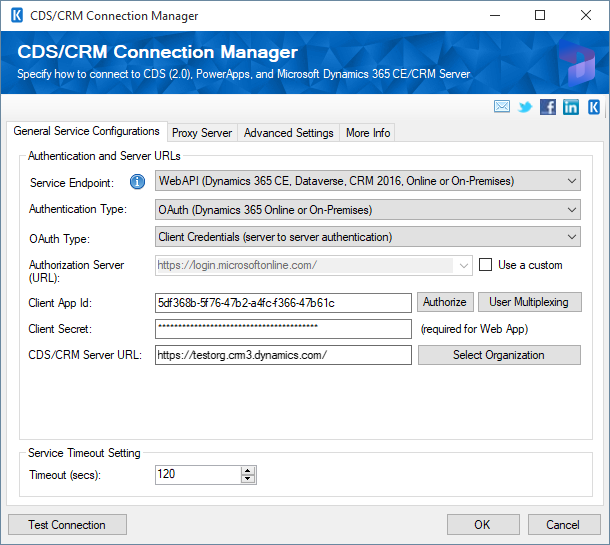
- You would need to create one Microsoft Dynamics CRM connection manager that connect to your CRM system. The connection manager is going to be used as both source and target, so that we read data from the CRM data, process it through DQS, and write it back to the same CRM server.

- In the SSIS package, create a new data flow.
- Within the data flow, create a new CRM Source Component that reads the CRM records for processing. As shown in the screen shots below, we selected account entity, and chose "accountid", "address1_stateorprovince" fields as the output columns of the source component. If you want to process a subset of CRM entity records, you can choose FetchXML option by providing a FetchXML query in order to retrieve the only records that you are interested.


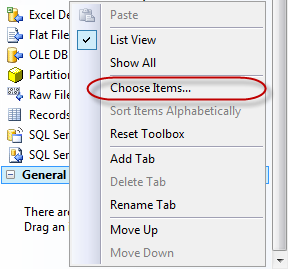
- Next thing to do is to drag Data Cleansing component from Visual Studio toolbox to the design surface of SSIS data flow, and connect it to the previously created CRM source component. Double click the Data Cleansing component to open its editor window.

- Click "New" button to create a new Data Cleasing Connection Manager, and enter the name of server that has DQS Service installed. Click "OK" button to return to the editor window.

- Select Data Quality Knowledge Base that you have. After you have a
selected knowledge base, you will be shown a list of available domains.

Note: Creating and managing DQS knowledge base and domains are out of scope for this blog post. You may check SQL server documentation for further details. - Go to Mapping page, and select the field that we need to process in the top grid, then select a domain for the data cleansing process.

Note the value in Output Alias column in the bottom grid, it will be used by DQS cleansing component to output the corrected data for downstream pipeline components. - Click OK button to finish configuring DQS Cleansing component.
- Create a new CRM destination component and connect it to the DQS Cleansing component. Double click the destination component to bring up its editor window.
- Select the same CRM connection manager, and choose Update as Action option, select the same entity that you have chosen in CRM source component.

- Navigate to the destination component's Columns page, and make sure to map the Output column from DQS Cleansing component to the original CRM field so that we write the processed data back to CRM.

-
After the data flow is finished, you can start to run it. If everything goes right, you can see a screen like the following one.

- It is now time to verify the result of DQS cleansing. The following screen is the result of the process. As you can see, all states have been updated to their two-letter standard code.


Summary Notes
- This blog post provides a quick tutorial about how to implement data quality solution for Microsoft Dynamics CRM using SQL Server DQS Cleansing component andSSIS Integration Toolkit.
- You can run the developed SSIS package at scheduled time using SQL Server scheduling functionality, so that you can process data to enforce data rules through DQS on a schedule-basis. It can be daily, or every few hours, maybe even every few minutes depending on your business requirement.
- You have been shown how to correct CRM data within the system using DQS Cleansing component, the same technique can be used to implement data quality solution when you load external data into Microsoft Dynamics CRM. You just need to add DQS Cleansing component before CRM destination component as we have demonstrated.
- DQS is a very broad topic, we only scratched the surface of this topic in this blog post. For more information about DQS, you should check SQL Server documentation.
- As mentioned in the post, it is not necessarily the case that SQL Server 2012 DQS is the only way to implement data quality solution. However, using Microsoft Data Quality Services provides a number of benefits, such as centralized knowledge base, flexible domain management, and consistent data quality framework, etc.
- SSIS Integration Toolkit is a commercial software, and I work for KingswaySoft, the provider of the tool.
Thanks for reading, hope this helps.