Showing posts with label SSIS. Show all posts

Wednesday, April 10, 2013

Presentation Deck and Demo Code for XrmVirtual Presentation

Thanks to all who have participated in the XrmVirtual session yesterday.

The following is the presentation deck that I used yesterday.


The demo code is also available for download at the following URL.

There are three solutions in the zip file, which are:
  • CrmWebServiceIntegration, this solution contains two projects which show you how to load data from an .csv file to CRM using early bound and late bound programming style. 
  • AzureServiceBus, this solution demonstrates the capability that you can use CRM Azure Service Bus in CRM plugin. In order for the solution to work, you need to first configure a service endpoint using CRM plugin registration tool, that you can use in the plugin code. 
  • OnPremiseServiceBus, this solution hows to send message to Service Bus for Windows Service (on-premise installation) from CRM plugin. 
In order to run the sample solutions, you need to update the configurations in the code. Those changes can be found from the project if you search "TODO" keyword. I have used hard-coded configuration for simplicity reason. 

I used CRM developer toolkit for the two plugin projects. In case you have trouble opening the AzureServiceBus project, it is probably because you don't have CRM developer toolkit installed. And also, I was using Visual Studio 2010 instead of VS2012. If you are using VS2012, you might have trouble to deploy the plugin from Visual Studio environment.

Please note that the sample code is for demonstration purpose, and it is NOT production quality code. 

The presentation's video recording is also available for download on XrmVirtual site if you are interested in the topics. Watching the video, you would have to bear with my accent, and my poor presentation skills.

Monday, April 08, 2013

Presentation on Enterprise Data Integration for Microsoft Dynamics CRM

I will be presenting for XrmVirtual tomorrow by the topic of Enterprise Data Integration for Microsoft Dynamics CRM. The session starts at 9am PST Apr 9th, 2013, and it will first kicks off by CRM SDK team to share with us some more recent updates in the latest SDK release (v5.0.15) related to UR13 and CRM Online updates.

My session will starts right after CRM SDK team's announcements and updates. In the session, I will try to cover some data integration options that you might have when working with Microsoft Dynamics CRM projects, including CRM SDK programming, Import Data Wizard, ETL, Service Bus, etc. The session will be concluded by sharing some tips and tricks that I learned when working with some large-scale data migration and integration projects, and also some lessons that I learned while designing and developing SSIS Integration Toolkit for Microsoft Dynamics CRM.

The session has been planned to be a one-hour session which includes CRM SDK team's updates, but I have got the permission from XrmVirtual team that the session can go a little longer (mainly due to the amount of information to be covered in one session), so the entire session could run for about 90 minutes although the original invite is only for 60 minutes.

The following is the download link to the meeting invite, you are more than welcome to join the session if this interests you.


Note that the session will be recorded by XrmVirtual team. If you can't make it, you will still have a chance to view the presentation at a later time. Further information about the session can be found at XrmVirtual website.

XrmVirtual is a user group for professional CRM developers who are passionate about Microsoft Dynamics CRM, and is run by two Dynamics CRM MVPs, Julie Yack and Shan McArthur.

See you then!


[UPDATE - Apr 10, 2013] I have uploaded the presentation deck file and demo code that you can download, check out here. The presentation's video recording is also available for download on XrmVirtual site if you are interested. Watching the video, you would have to bear with my accent, and my poor presentation skills.

Saturday, May 19, 2012

SSIS and CRM Series, Part 4 - Use SSIS to Implement Data Quality Solution for Microsoft Dynamics CRM

This is part 4 of Blog Series - Better Together, SSIS and Microsoft Dynamics CRM.

Scenario Summary

There is no doubt that data quality is important in business applications. High-quality data is critical to the efficiency of business operations.

Using Microsoft Dynamics CRM as your business application platform, it is a challenge to implement data quality solution that's both efficient and cost-effective.

In SQL Server 2012, Microsoft introduced Data Quality Services (DQS) which enables database or IT professionals to manage business data quality and ensure the data is suited for its business usage.

In this blog post, we are going to leverage Microsoft Data Quality Services (DQS) to implement data quality solutions for Microsoft Dynamics CRM applications using  SSIS Integration Toolkit.

For illustration purpose, we have the following CRM account records in the system that we want to process. You may have noticed that the State/Province field is filled with data of many different formats, which is the problem we want to fix, our goal is to update the field by converting its value to the standard two-letter state code, such as CA for California, WA for Washington, and so on. This is just a very simple sample for demo purpose, your business requirement of data quality solution could be more complex.

Prerequisites

You need to have a system that has the following components installed.
NOTE:  It is not necessarily the case that DQS is the only way to implement data quality solution. Without SQL Server 2012, you can still use a combination of SSIS transformation components to implement data quality solution in SSIS. However, using Microsoft Data Quality Services provides a number of benefits, which is the reason that we are using it in this blog post. 

Developing SSIS Data Flow

  • First, you would launch Business Intelligence Development Studio to create a new SSIS project, and then create a new SSIS package within the project. 
  • You would need to create one Microsoft Dynamics CRM connection manager that connect to your CRM system. The connection manager is going to be used as both source and target, so that we read data from the CRM data, process it through DQS, and write it back to the same CRM server.
  • In the SSIS package, create a new data flow. 
  • Within the data flow, create a new CRM Source Component that reads the CRM records for processing. As shown in the screen shots below, we selected account entity, and chose "accountid", "address1_stateorprovince" fields as the output columns of the source component. If you want to process a subset of CRM entity records, you can choose FetchXML option by providing a FetchXML query in order to retrieve the only records that you are interested.


  • Next thing to do is to drag Data Cleansing component from Visual Studio toolbox to the design surface of SSIS data flow, and connect it to the previously created CRM source component. Double click the Data Cleansing  component to open its editor window.
  • Click "New" button to create a new Data Cleasing Connection Manager, and enter the name of server that has DQS Service installed. Click "OK" button to return to the editor window.
     
  • Select Data Quality Knowledge Base that you have. After you have a selected knowledge base, you will be shown a list of available domains. 
    Note: Creating and managing DQS knowledge base and domains are out of scope for this blog post. You may check SQL server documentation for further details.
  • Go to Mapping page, and select the field that we need to process in the top grid, then select a domain for the data cleansing process.

    Note the value in Output Alias column in the bottom grid, it will be used by DQS cleansing component to output the corrected data for downstream pipeline components.
  • Click OK button to finish configuring DQS Cleansing component. 
  • Create a new CRM destination component and connect it to the DQS Cleansing component. Double click the destination component to bring up its editor window. 
  • Select the same CRM connection manager, and choose Update as Action option, select the same entity that you have chosen in CRM source component.
  • Navigate to the destination component's Columns page, and make sure to map the Output column from DQS Cleansing component to the original CRM field so that we write the processed data back to CRM.
  • After the data flow is finished, you can start to run it. If everything goes right, you can see a screen like the following one.
  • It is now time to verify the result of DQS cleansing. The following screen is the result of the process. As you can see, all states have been updated to their two-letter standard code.

Summary Notes

  • This blog post provides a quick tutorial about how to implement data quality solution for Microsoft Dynamics CRM using SQL Server DQS Cleansing component andSSIS Integration Toolkit
  • You can run the developed SSIS package at scheduled time using SQL Server scheduling functionality, so that you can process data to enforce data rules through DQS on a schedule-basis. It can be daily, or every few hours, maybe even every few minutes depending on your business requirement. 
  • You have been shown how to correct CRM data within the system using DQS Cleansing component, the same technique can be used to implement data quality solution when you load external data  into Microsoft Dynamics CRM. You just need to add DQS Cleansing component before CRM destination component as we have demonstrated.
  • DQS is a very broad topic, we only scratched the surface of this topic in this blog post. For more information about DQS, you should check SQL Server documentation. 
  • As mentioned in the post, it is not necessarily the case that SQL Server 2012 DQS is the only way to implement data quality solution. However, using Microsoft Data Quality Services provides a number of benefits, such as centralized knowledge base, flexible domain management, and consistent data quality framework, etc. 
  • SSIS Integration Toolkit is a commercial software, and I work for KingswaySoft, the provider of the tool. 
Thanks for reading, hope this helps.

Friday, May 18, 2012

SSIS and CRM Series, Part 3 - Use SSIS to Perform Batch Update or Delete in CRM

This is part 3 of Blog Series - Better Together, SSIS and Microsoft Dynamics CRM.

Scenario Summary

The terminology of Batch that we use in this blog post might be slightly different from the same term used in ETL job, which is usually referred as scheduled batch job.

In this blog post, we are trying to use SSIS to do some ad-hoc batch process in order to fix the CRM data that might have problems.

Let's visit two possible scenarios that you might run into.

The first possible scenario is, your CRM system has been running for a few years. Your organization started the CRM system with loose control of data entry in the beginning, so your system is stuffed with all kind of crappy data, including incorrectly formatted data (such as phone, email address, etc.). As time goes, the management team starts to grow their expectation about the data quality in the CRM system which is essentially the vehicle that drives the business. Let's say, you have got hundreds of thousands of account records (or even more) in the system that you need to fix the format of a phone number field. Without a proper tool, this is going to be a big undertake considering the number of records that you need to fix.

Another possible scenario is, you (or someone else in your organization) have entered some significant amount of data into CRM system, and you come to the situation that they are no longer needed, and you need to find a way to delete them all from the system quickly. You would probably think this is an easy job, since you can do bulk delete in CRM.  However, when you need to deal with more than a few thousands of records, you will soon realize that this is not a fun job at all. It requires a lot of mouse clicks to get through all pages and click Delete ribbon button and wait for each record to be deleted from the system. Your time can be better used for something else as a professional developer!

With the availability of SSIS Integration Toolkit, let's see how you can let the toolkit do all the heavy lifting for you so that you can get the job done quickly.

Let's get started.

Prerequisites

You need to have a system that has the following components installed.

Developing SSIS Data Flow

  • First, you would launch Business Intelligence Development Studio to create a new SSIS project, and then create a new SSIS package within the project. 
  • You would need to create one Microsoft Dynamics CRM connection manager that connect to your CRM system.
  • In the SSIS package, create a new data flow. 
  • Within the data flow, create a new CRM Source Component that reads the CRM data that you need to process by choosing the concerned entity (or use FetchXML option if you need to apply filtering when retrieving data). 
  • In the data flow, create a new CRM Destination Component, and connect it to the CRM Source Component that we have just created. The CRM destination component will be used to write data back to or delete CRM records from the same CRM server. So in its destination component, we simply choose the same Connection Manager, and the same CRM entity that you have chosen in the source component, select Update or Delete as the Action option depending on what you are trying to achieve, and leave all the rest options as default. 
  • In the case when we want to use batch update to fix data issues, we would add SSIS transformation component(s) between the CRM source component and CRM destination component. Those in-between transform components implement the business logics with regard to how you want to fix the data. The following is a simple sample data flow. In the data flow, we read CRM account records from the system, and do some formatting to the record's telephone1 field using SSIS Derived Column transformation component, and then update the CRM account records back to the original CRM server.
  • To demonstrate the batch delete functionality using SSIS, we use FetchXML query in CRM source component to retrieve all accounts that have name started with "Test", our intention is to delete all of them using CRM destination component.
  • After we have finished developing the data flow, we can start to run the data flow to perform the batch update or delete in CRM system. The following screen shows the result for my SSIS batch delete data flow, in which case I have deleted 1,604 account records. The data flow takes roughly a couple of minutes to finish for the amount of records that I have.

Summary Notes

  • You can use SSIS to perform ad-hoc batch update or delete for Microsoft Dynamics CRM in a quick fashion. SSIS is a great tool that can be helpful in many scenarios, this blog post has just illustrated the mentioned two scenarios. If you know SSIS well enough, you can do a lot more by using the tool. 
  • The key of doing the batch update or delete is to use the same connection manager and same CRM entity in both SSIS source component and destination component. 
  • In the sample batch update data flow shown in this blog post, I have used a very simple business logic. SSIS is capable to perform complex data transformation and manipulation using various transformation components. 
  • I have skipped some basic details in this blog post about how you create SSIS project, how you add connection managers, and how you add CRM components to your SSIS toolbox. All such details can be found in part 1 of this blog series or the product's help manual page
  • SSIS Integration Toolkit is a commercial software, and I work for KingswaySoft, the provider of the tool. 
Thanks for reading, hope this helps. 

Thursday, May 17, 2012

SSIS and CRM Series, Part 2 - Use SSIS to Copy CRM Configuration Data from One Environment to Another

This is part 2 of Blog Series - Better Together, SSIS and Microsoft Dynamics CRM.

Scenario Summary

In CRM projects, we often rely on configuration data to implement business logics. One of such scenarios is CRM workflow. It is very common that we use lookup reference in CRM workflows to implement business rules.

The following is a sample workflow that fires when a new CRM account is created. The workflow will create a task record when the CRM account record belongs to country USA (Country in this case is a custom entity, which has a 1:N relationship to CRM account entity).
All is good. We have the workflow developed in our development (DEV) environment. After your verification is done in DEV, you will start to promote the changes to your testing or production environment. That should be an easy job with the help of CRM solution framework, you would say. However, this might not be the case exactly. After your solution is imported into your target environment, you will then realize that your workflow isn't working. You are getting an error message saying "The process includes an invalid reference", shown as the following screen.  
As indicated by the error message, the problem is rather simple, your workflow is using a lookup reference, but the referenced CRM record (the USA country record in our case) doesn't exist in the target system.

If you have not worked long enough with Microsoft Dynamics CRM, you might be wondering to just simply create the CRM record(s) in the target system from CRM user interface using the same values that you have from the source system, and expect the workflow to work. You will soon realize that this will actually not work, CRM workflow won't use the record(s) that you have manually created. The reason is, as far as CRM reference goes, CRM only recognize a record's ID in GUID format, not the primary field value or values from any other fields.

So, how can we fix this problem?

The answer is quite simple too, you basically have two solutions. The first solution is to manually fix the reference in the target system one by one, by opening each workflow in its designer. The second option is to find a way to copy (migrate, transfer, or whichever terminology that you may think appropriate) such CRM configuration data to the target system by the same IDs along with the values from other fields. The choice would be obvious, the second one would be a much better option if there is an easy to do so.

Assuming that you have decided to go with the second option, you would then be looking for tools that can help copy configuration data from one environment to another. There are a number of ways to do this, you can possibly use CRM native tools including its exporting tool and CRM Data Import Wizard to first export data from source system and then import to the target system. However, there are a number of limitations if you use CRM export and import tools, and there is almost no way to manage incremental changes. You would soon started blame yourself if you decided to go this path. Alternatively, you can write C# (or VB) code using CRM SDK to export data from source system and import to the target one. This is not an easy job either, as it takes effort to write code, especially it becomes quite challenging when you need to make it generic enough in order for the tool to support more than one entity. My previous preference was CRM Configuration Data Utility, which is a utility built for CRM4, and it is a very handy tool to handle this situation. I have used the utility extensively in my previous CRM projects.

With the availability of SSIS Integration Toolkit, we can be even more productive when it comes to this business scenario.

Let's get into action to see how this can be done using SSIS Integration Toolkit.

Prerequisites

You need to have a system that has the following components installed.

Develop SSIS Data Flow

  • First, you would launch Business Intelligence Development Studio to create a new SSIS project, and then create a new SSIS package within the project. 
  • You would need to create two Microsoft Dynamics CRM connection managers that connect to your source system and target system.
  • In the SSIS package, create a new data flow. 
  • Within the data flow, create a new CRM Source Component that reads data from the source system by choosing the entity that you want to copy data from. In our case, the entity we are working with is called new_country, your entity might be something different. 
  • In the data flow, create a new CRM Destination Component, and connect it to the CRM Source Component that we have just created. The CRM destination component will be used to write data to the target system. In the destination component, you would choose the same CRM entity as the source component, select Upsert as the Action option, and Primary Key as Upsert Matching Criteria option. Also make sure to select "Remove Unresolvable Reference" option.
  • After you have finished developing the data flow (which should only take you a few minutes if you are not new to SSIS), you can start to run the data flow to copy data from your source system to target system (As shown below, I have copies 273 records with one single click).

Some Final Notes

  • The data flow can be reused, so whenever you have made any further changes in your source system, you can simply fire the SSIS package and run it again, your target system will have all the latest configuration data. 
  • In this blog post, I have shown you one typical problem that you need to deal with when working with Microsoft Dynamics CRM. SSIS Integration Toolkit is not limited to any particular entity, you can copy data from one environment to another, for any entity that can be created and updated by CRM SDK through its web service interface. 
  • I have skipped some basic details in this blog post about how you create SSIS project, how you add connection managers, and how you add CRM components to your SSIS toolbox. All such details can be found in part 1 of this blog series or the product's help manual page
  • SSIS Integration Toolkit is a commercial product, and I work for KingswaySoft, the provider of the tool. 
Hope this helps. 

Wednesday, May 09, 2012

SSIS and CRM Series, Part 1 - Use SSIS to Run Scheduled Jobs for Microsoft Dynamics CRM

In CRM projects, we often have the requirements to run scheduled jobs, on either daily, monthly basis (or maybe even every few minutes), to implement certain business logics. For instance, one of the typical scenarios is a business entity has an expiry date, and you want to deactivate all records that have passed the expiry date in the system. The challenge with Microsof Dynamics CRM is, there is currently no out-of-box support of scheduled jobs.

With the availability of SSIS Integration Toolkit for Microsoft Dynamics CRM, you can leverage SQL Server scheduling capability to implement this kind of scheduled jobs very quickly.

In this blog post, I will talk you through the process of implementing a scheduled SSIS job that runs against Microsoft Dynamics CRM. The business scenario of the implementation is, we have a CRM entity called Legislation, which has a physical name of new_legislation (This is just a make-up sample, I couldn't find a better sample at this moment) in the system. Legislation entity has a field called Expiry Date, with new_expirydate as its physical name. What we try to achieve in this blog post is, the SSIS job runs once a day at off-peak hour to deactivate all Legislation records in the system that has an Expiry Date of today.

Let's get started.

Creating SSIS Project and Package

  1. First of all, we need to ensure we have an SSIS development environment with SSIS Integration Toolkit for Microsoft Dynamics CRM installed. The SSIS development environment could be a SQL Server 2008, SQL Server 2008 R2, or SQL Server 2012 development machine that has Business Intelligence Development Studio (BIDS) installed. 
  2. We would then create an SSIS project after we have launched Business Intelligence Development Studio (or Visual Studio if SQL Server 2012 is used).
  3. In the SSIS project, we will need to add a new package by selecting "New SSIS Package" option after right-clicking SSIS Packages in Visual Studio Solution Explorer.

Creating CRM Connection Manager and a SSIS Data Flow Task

After we have created a SSIS package, we would then need to create a connection manager which facilitates the connection with Microsoft Dynamics CRM server.
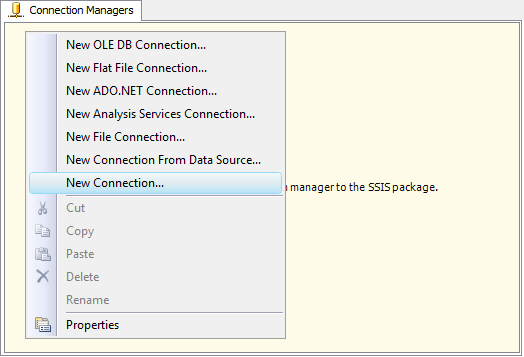
  1. Within the SSIS Package that we created above, right-click in Connection Manager area, and choose "New Connection".
     
  2. We will be then prompted to select a connection manager from a list of all available connection managers in the system, including those provided by Microsoft and third-party software vendors. Choose "DynamicsCRM" from the list.
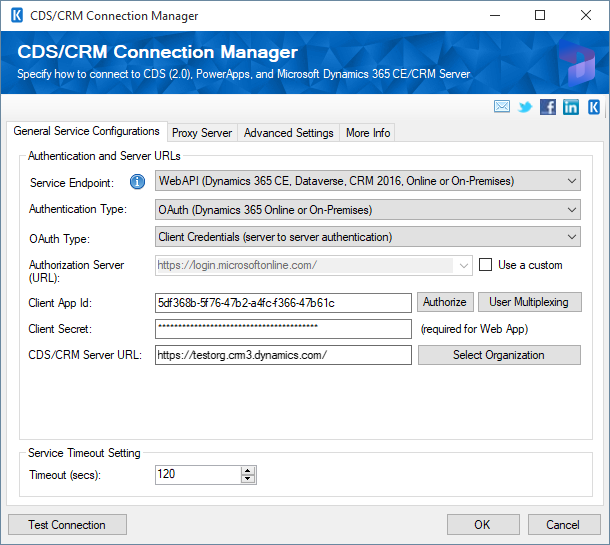
  3. We would then fill in the necessary information in order to be able to connect to our CRM server.


Creating a Data Flow Task

Within SSIS package, we can see four tabs. Control Flow and Data Flow are two of them where we would spend most of time when developing our ETL jobs (CRM scheduled jobs in our case here). As indicated by the names, SSIS Control Flow manages and controls the ETL tasks within the SSIS package, which can be made of various data flow tasks and some other ETL tasks. Within Data Flow task, we can design the flow of our data from one or more data sources to a destination.

Creating a data flow task is fairly simple, we can drag Data Flow Task from toolbox and drop it to the design surface of SSIS Control Flow. 

Adding a CRM Source Component

After we have created a data flow task, we would then double-click the task to switch to its design surface, in which case, we will be switched to Data Flow view. Now we need to create a CRM source component within the data flow task so that we can read records from CRM system that we need to perform the scheduled manipulation. 
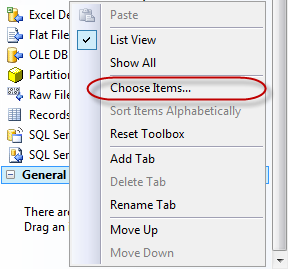
  1. In order to add CRM source component to data flow, we need first add it to SSIS toolbox. To do so, we right-click on the toolbox area to bring up the context menu, where we select "Choose Items..." option as shown below.
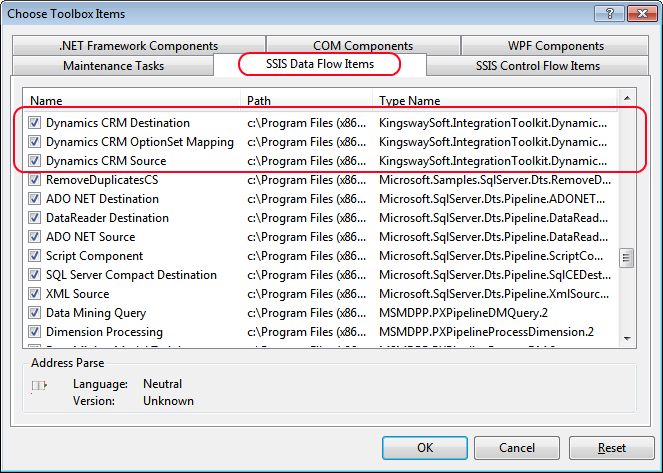
  2. We would now be presented with a window called "Choose Toolbox Items", switch to "SSIS Data Flow Items" tab, and find Dynamics CRM Destination and Dynamics CRM Source components from the list, and make sure to check both of them (Dynamics CRM Destination component will be used next).
  3. Then we can add a Dynamics CRM Source component by dragging it from SSIS toolbox and dropping it to the data flow design surface. 
  4. In CRM Source Component, we need to choose a CRM connection manager that we have previously created. Also we would need to specify how we read data from CRM. We can choose to read data from a CRM entity, or we can provide a FetchXML query to read data from CRM. In our case, we will use FetchXML option so that we can read the only CRM records that we need to process.
In the above sample, we have tried to use a simple FetchXML query, which reads all CRM Legislation records that are active (statecode = 0) and have an Expiry Date of today.

SSIS Integration Toolkit for Microsoft Dynamics CRM supports any complex FetchXML query, and also you can use SSIS variables to parameterize your query, which gives you all the flexibility. 

Adding Processing Logic Using SSIS Transformation Components

After we have created the CRM source component, the next thing we need to do is to make changes to the CRM records in order to deactivate them. SSIS provides a number of transformation components that help transform and manipulate data. In our case, we will use Derived Columns transformation component to achieve our purpose. 
  1. Drag Derived Column component from SSIS toolbox and drop it to Data Flow design surface.
  2. Connect the Derived Column component to the CRM source component we previously created in the same data flow task.
  3. Double click the Derived Column component to open its editing window.
  4. In Derived Column Transformation Editor window, choose "Replace 'statecode'" in the grid, and enter 1 as expression (for most CRM entities, setting statecode to 1 is to deactivate the record). The component should look like the following screen.
After this step, we will have a data flow like the following screen. 
As mentioned, SSIS has a lot more transformation components that can be used to implement different business logics. We have tried to keep the sample simple. Even the Derived Column transformation component can be used in many different ways. 

Adding a CRM Destination Component

The final thing to do to finish the data flow development is to add a CRM destination component to the data flow. 
  1. Drag Dynamics CRM Destination component from SSIS toolbox and drop it to Data Flow design surface.
  2. Connect the CRM destination component to Derived Column component that we created in previous step.
  3. Double click the CRM Destination component to open its editing window.
  4. Choose the CRM connection manager that we previously created, select Update as the Action option. Then select "new_lesgislation" as the Destination Entity.
After this is done, our data flow development is finished. The entire development shouldn't take you more than a few minutes, if you have been acquainted with SSIS. So you will have a data flow like the following screen. 

Schedule SSIS Package

After we have developed the SSIS package, the next thing we need to do is schedule it using SQL Server. This should be typically handled by DB team.

SQL Server has great scheduling capability so that we can run tasks at scheduled time. I will not cover all the details about how to setup such scheduled jobs in SQL Server, which is a pretty straight-forward process using SQL Server Agents, and in most cases are handled by your DBA guys. The following screen shows the available scheduling options that you can use to run SSIS packages. 

After your DB team has setup the scheduled tasks for you, you can be rest assured that the business logics that you have implemented in SSIS packages will be fired based on the schedule that you have defined. 

Final Notes

  1. In the community, we often talk about scheduled CRM Workflow, which is not a feature available today. With the availability of SSIS Integration Toolkit, you can implement almost any such kind of business logics using SSIS. 
  2. As a disclaimer, SSIS Integration Toolkit is a commercial product, and I work for KingswaySoft, the provider of the tool. 
Thanks for reading, hope this helps. 

Blog Series - Better Together, SSIS and Microsoft Dynmaics CRM

For many of us who know Microsoft SQL Server Integration Services (SSIS), we tend to think SSIS as an ETL tool or a data integration platform.

But SSIS can do much more than just ETL and date integration, if it is used wisely.

In this series of blog posts, I will talk about how you can make use of SSIS in your CRM projects to help address some common challenges that you may often run into.
This series will probably take me a bit time to finish them all, I will try to post them as fast as I can. If you have any interests to contribute to the series or even you want to add more topics, please feel free to drop me a note by adding a comment below.
[UPDATE - July 26, 2012] I originally planned to write a series of 5 blog posts, but I have found that the last topic is a little boring. So I am concluding this blog series.

Thanks for reading, hope this series will help. 

Tuesday, April 24, 2012

The other half story about BDD, SSIS, and CRM

[UPDATE - July 7, 2017] In our most recent v9 release, we have added the support of multi-threaded writing in our CRM destination component, so this blog post is no longer useful. You can simply turn on multi-threaded writing in the destination component to achieve the same (with much greater flexibility or even better performance). [/UPDATE]

[NOTE - May 5, 2016] The config file changes are no longer necessary since our v7.1 release on May 5, 2016. The technique described in this blog post is still useful if you are using an older version or even if you may be using a different approach for data migration or integration.

This is an update of my previous blog post about using BDD component in SSIS to improve the performance of loading data into Microsoft Dynamics CRM.

I was only able to tell the half story of the technique in the previous blog post. Here is the other half.

In order to make full use of the BDD component in SSIS data flow, you need to increase the connection limit that is imposed by Microsoft .NET framework, which is a maximum of 2 connections per host (e.g. server). In order to overwrite this limit, you need to modify DTExec.exe.config and DtsDebugHost.exe.config files under DTS\binn folder by adding the following connectionManagement section.
<configuration>
 ...
 <system.net>
   <connectionManagement>
     <add address="*" maxconnection="100"/>
   </connectionManagement>
 </system.net>
</configuration>
The above configuration allows up to 100 connections per host at the same time. You may change the number based on your needs. Note that if you are using 64-bit system, you will need to make changes to the files under both Program Files and Program Files (x86) folders. 

After making the above changes, I observed more performance improvement in my SSIS data flow. I was able to load 0.9 millions of records into CRM within one hour (5 outputs and 10 outputs had almost identical performance benchmark, while 5 outputs outperformed 10 outputs a bit in my test). 

This has been reflected in our product FAQ page

If you write custom code to load data into CRM using multi-threading, you should make similar changes to your application's config file as well. 

It should also be noted, if your SSIS data flow reads or writes data simultaneously to a single host using web service interface, you should consider making this change, regardless it is WCF, WSDL service, or maybe even a REST service. 

This is a tip that I learned from CRM project manager Mahesh Hariharan at xRM Acceleration Lab during the week of Apr 2 to Apr 6, which was held at Microsoft campus in Redmond. 

BTW, in case you don't know, Microsoft has an xRM Acceleration Lab program which is open to Microsoft Dynamics CRM partners to help them build up the necessary technical skills to bring your solutions faster to the market. The lab is a one-week one at Microsoft campus, which consists of a number of technical sessions presented by CRM MVP folks and some product team members. The best part about the lab is, your team resources will be working with a gang of MVP folks (and some product team members) side-by-side to develop solutions during the week. This is a very efficient way to build up the technical skills by building something real on top of Microsoft Dynamics CRM platform. 

Hope this helps. 

Tuesday, April 10, 2012

Release: Service Pack 3 of SSIS Integration Toolkit for Microsoft Dynamics CRM

 Today, we are happy to announce the third service pack of SSIS Integration Toolkit for Microsoft Dynamics CRM, which is now available for download. The release includes the following updates and fixes.
  • Update: We made a minor change to License Manager program, which now prohibits possible duplicate license requests by clicking the OK button more than once in "Enter Product License" window
  • Fixed: In CRM Source Component Editor, when you enter a valid FetchXML, and immediately click "OK" button to save the change, the source component does not properly populate CRM fields due to the lazy-editing feature (for performance reason) used in the XML editor component
  • Fixed: When you update statecode and statuscode for salesorder or opportunity entity, you might run into exceptions
  • Fixed: The CRM destination component doesn't provide correct CRM record's ID in GUID value after the record has been created in CRM (Thanks to Javier for reporting this issue)
A new build is now available for download at our product download page.

In order to install the new build, you will need to uninstall the previous version first.

On a side note, from this post on, I will move such kind of product announcements to the blog section of my company website. But I might share some product news here if it is something technically interesting.

Thank you for reading.

Friday, March 23, 2012

Release: Service Pack 2 of SSIS Integration Toolkit for Microsoft Dynamics CRM


Today, we are happy to announce that the second service pack of SSIS Integration Toolkit is now available for download. The release includes the following updates and fixes.
  • Update: We added a few social buttons to the Connection Manager Editor interface, including an email button, to make it easy for you to reach us
  • Update: We added an icon to the head cell of CRM Destination Component's grid, when Upsert action is selected, and Manually Specify option is chosen as Upsert Matching Criteria. This provides an indication of the column's importance (Thanks Scott for the advice)
  • Update: We disabled the ability to change CRM Connection Manager's service endpoint after it has been created. The reason is, different service endpoint has incompatible metadata. Making change to service endpoint often causes problems to the CRM Source Component or CRM Destination Component that uses the connection manager
  • Update: There is a small change to the License Manager program, so that it now prompts you to save the requested (or activated) license to a file if the attempt of saving the license to Windows registry fails because of insufficient privileges on the system. This gives you the possibility to later install the license file using a different user account in the system
  • Fixed: You might experience the following error message in some environment when you are using SOAP 2011 service endpoint for CRM Source component. "System.ServiceModel.FaultException`1[KingswaySoft.DynamicsCrmServices.Soap2011.CrmOrganizationService.OrganizationServiceFault]: Paging cookie is required when trying to retrieve a set of records on any high pages. (Fault Detail is equal to KingswaySoft.DynamicsCrmServices.Soap2011.CrmOrganizationService.OrganizationServiceFault)." (Thanks to Myles for reporting this issue)
  • Fixed: You might experience the following error message when you are using "Manually Specify" option for Upsert action, with a complex type field (i.e. lookup) selected as the matching field. "There was an error while trying to serialize parameter http://schemas.microsoft.com/xrm/2011/Contracts/Services:query. The InnerException message was 'Type 'KingswaySoft.DynamicsCrmServices.Soap2011.CrmOrganizationService.EntityReference' with data contract name 'EntityReference:http://schemas.microsoft.com/xrm/2011/Contracts' is not expected. Add any types not known statically to the list of known types - for example, by using the KnownTypeAttribute attribute or by adding them to the list of known types passed to DataContractSerializer.'.  Please see InnerException for more details." (Thanks to Jean for reporting this issue)
A new build is now available for download at our product download page.

In order to install the new build, you will need to uninstall the previous version first.

Thank you for reading. 

Monday, March 05, 2012

Release: First Service Pack of SSIS Integration Toolkit

Following our release of SSIS Integration Toolkit for Microsoft Dynamics CRM, we have received a warm welcome by the community. Thanks everyone.

Today, we have released our first service pack for the toolkit which includes the following bug fixes.
  • Fixed: CRM destination component throws error when writing data to currency fields, if SOAP 2011 endpoint is used (Thanks Les for reporting this issue)
  • Fixed: When CRM Source Component Editor is re-opened, the SSIS metadata of CRM fields are always repopulated. If you click OK to dismiss the window without making any changes to the source component, it invalidates the mappings for all the downstream components
  • Fixed: CRM destination component does not handle writing activityparty fields properly for SOAP 2011 endpoint
  • Fixed: You might experience expired token error if your data flow task runs for hours, when SOAP 2011 endpoint is used for CRM Online or IFD deployment
A new build is now available for download at our product download page.

In order to install the new build, you will need to uninstall the previous version first.

Thanks for reading. 

Friday, February 17, 2012

Improve CRM Data Load Performance by using BDD in SSIS

[UPDATE - July 7, 2017] In our most recent v9 release, we have added the support of multi-threaded writing in our CRM destination component, so this blog post is no longer useful. You can simply turn on multi-threaded writing in the destination component to achieve the same (with much greater flexibility or even better performance). Also, the number discussed in the blog post is super outdated. I am keeping the blog post here really just for reference purpose, you should not use the numbers as your benchmark baseline. [/UPDATE]

[DISCLAIMER] This blog post mainly talks about the benefits of our commercial offering, but the practice should be generally applicable to other approaches or components that you might be currently using in SSIS. It is not my intention to turn my blog into a commercial space, but I do believe this blog post would help even your are using something different, assuming that SSIS is the tool for your data integration purpose. [/DISCLAIMER]

If you have ever been engaged in any Microsoft Dynamics CRM data integration project, I am relatively sure that you have invested time and resources to tune your data integration component to its maximum possible performance so that it takes the least time to finish the data integration tasks.

This blog post shows you how to load one million records into Microsoft Dynamics CRM 2011 on-premise installation with a two-hour time range, using our product - SSIS Integration Toolkit for Microsoft Dynamics CRM, by taking advantage of the Balanced Data Distributor (BDD) component that Microsoft released to public community that works for SQL Server Integration Services (SSIS).

In case you don't know BDD component, here is a little background information about the component. BDD is a data flow transformation component that takes a single input and evenly distributes the incoming rows to one or more outputs uniformly via multithreading. The purpose of BDD component is to maximize the output performance of ETL data flow tasks. BDD can be used when your downstream pipeline component (say the destination component) is the bottleneck of the entire data flow task.

When working with Microsoft Dynamics CRM data integration, we have a perfect reason to use BDD, mainly because writing data into CRM is slow due to the nature of web service interface. In other words, In most of cases, you would find that the CRM destination component which writes data into CRM is the bottleneck of your data flow tasks. Using BDD, we can distribute incoming rows from upstream pipeline components and split them into multiple CRM destination components, so they write data into CRM simultaneously and concurrently by taking advantage of the multi-threading capability of SSIS engine.

To demonstrate the benefits of using BDD component, I first tried a single CRM destination component in my data flow task without using BDD, so the data flow writes data into CRM using a single thread. It took me 5 hours, 48 minutes to finish the load of 1,000,000 record into CRM contact entity. Here is what the data flow task looks like.
The following screenshot shows how the data flow runs using dtexec command line.

Next, I tried to use BDD and split the input into 10 outputs so that we write to CRM contact entity using 10 concurrent threads. The data flow finishing loading 1,000,000 records within 2 hours, 3 minutes. Here is what the data flow task looks like.

The following screen shots shows how the data flow runs using dtexec command line.
The improvement is about 2.84 times, it's not surprising that it's not exactly 10 times faster. 

[UPDATE - Apr 24, 2012] In order to make full use of the BDD component, you need to increase the connection limit that is imposed by Microsoft .NET framework, which is a maximum of 2 connections per host (e.g. server) for service calls as far as CRM platform is concerned. In order to overwrite this limit, you need to modify DTExec.exe.config and DtsDebugHost.exe.config files under DTS\binn folder by adding the following connectionManagement section.
<configuration>
 ...
 <system.net>
   <connectionManagement>
     <add address="*" maxconnection="100"/>
   </connectionManagement>
 </system.net>
</configuration>
The above configuration allows up to 100 connections per host at the same time. You may change the number based on your needs.

After making the above changes, I observed more performance improvement. I was able to load 0.9 millions of records within one hour (5 outputs and 10 outputs had almost identical performance benchmark). Note that this was done on a desktop computer, if you have a better server with performant IO and more computer power, I am relatively sure that you can load one million records within one hour. 

A few facts

  1. This is not a scientific benchmark. 
  2. My testing was conducted on a desktop computer of 4-year old which has everything installed in the single box. The following is the spec of the computer. 
    • Processor: Intel Core 2 Quad Q9550 @2.83GHz
    • Memory: 8GB PC2-6400 DDR2-SDRAM
    • Hard Disk: Seagate 7200RPM SATA 1.5Gb/s
    • Operating System: Windows 2008 R2 Server
    • Database Server: SQL Server 2008 R2
    • Microsoft Dynamics CRM Server 2011 with Rollup 6
    • SSIS Adapter: KingswaySoft SSIS Integration Toolkit for Microsoft Dynamics CRM
  3. The testing was done in an on-premise environment, your data load performance would be different if you are using CRM online or partner-hosted environment. 
  4. I have intentionally used 64-bit dtexec.exe with the hope that we can take advantage of SSIS 64-bit run-time. Controversy to what I believed, running it using 32-bit dtexec.exe is actually not slower, but 10% faster than 64-bit runtime. The reason is probably related to the cost associated with memory addressing in 64-bit runtime. 
  5. My input data is very simple, it has only two fields, firstname and lastname. When you have more fields, you would expect the data load performance to degrade in certain scale. 
  6. The number that I have got is on a desktop computer with everything installed on the same box, it should NOT be considered as a performance benchmark. Also the techniques discussed in the blog post are outdated at today's standard. I am keeping the blog post really just for reference purpose. 

Summary

  • BDD improves the data load performance by taking advantage of the multi-threading capability of SSIS engine. 
  • You should carefully choose a right number of the outputs for BDD component. It's not the case that the more the better. Depending on your servers' capacity (including processor, memory, IO system) and the network latency between your client system and CRM server, it could be 3, 5, 10, or something else for the maximized performance, which you may find out by running different tests. 
  • There are many ways that you can use to improve the data load performance, BDD is just one of the easy ways that make the data load faster, which is the main topic that we are trying to cover in this blog post.  
If you are interested in any of the data flow tasks or sample data, please feel free to let me know, so that I can send you the SSIS package.

Thanks for reading.

Thursday, February 09, 2012

New Licensing Model and Pricing Structure of SSIS Integration Toolkit

Following my previous announcement of the availability of SSIS Integration Toolkit for Microsoft Dynamics CRM, we received quite some feedback about the offering. One of the feedbacks that we received was the licensing model was too complicated to understand and the price was a little too high.

For this reason, we have adjusted the licensing model and also updated pricing structure, so it is a lot simpler and cheaper than the previous one.

Under the new licensing model, we only have two product licenses, and one maintenance & support term.

SSIS Integration Toolkit for Microsoft Dynamics CRM, Perpetual License $895.00
SSIS Integration Toolkit for Microsoft Dynamics CRM, One-year Subscription License $495.00
SSIS Integration Toolkit for Microsoft Dynamics CRM, One-year Maintenance & Support $395.00

A new build of the software has been uploaded to accommodate those changes, which also includes some important bug fixes since the announcement.

No license is required any more (not even a trial license) if you just need to create an SSIS package using the toolkit, or play with the toolkit within SQL Server Business Intelligence Development Studio. However, you should acquire a license if you want to deploy the SSIS packages to an environment where you want the packages to be executed on a scheduled basis.

Thanks for reading.

Friday, January 20, 2012

Introducing SSIS Integration Toolkit for Microsoft Dynamics CRM

Today, I am happy to announce the availability of SSIS Integration Toolkit for Microsoft Dynamics CRM, an easy-to-use and cost-effective data integration library for Microsoft Dynamics CRM and Microsoft SQL Server Integration Services (SSIS).

First of all, this is a commercial offering, which we hope to bring a better solution to the market that can make your data integration job easier.

The toolkit is a set of SSIS adapters that allow you to read data from Microsoft Dynamics CRM server, or write data to it.

Among all the goodnesses, here are some highlighted features that you might be interested.
  • Native CRM 2011 SOAP interface support
  • Support for Microsoft Dynamics CRM 2011 and 4.0
  • Support for On-premise, IFD (federated) and Online deployments, including Office 365 (OSDP) environment
  • Support for CRM Entity or FetchXML query as data source in CRM source component
  • Support for Create/Update/Delete/Upsert actions in CRM destination component. When Upsert action is used, you have three matching options to choose to identify whether it is an existing record in CRM for update, or it's something not in the system that the component should create for you (insert). The three options include a combination of manually selected fields, CRM primary key, or CRM duplicate detection
  • One-click to toggle whether you want all or none of fields from a CRM entity in source component, which makes you more productive when selecting the only necessary fields to read data from CRM
  • Automatic mapping to the CRM fields in the destination component by matching the names from upstream components
  • You can set a picklist/optionset field value by either its integer value or its user friendly label
  • Native support of CRM many-to-many relationship to associate or disassociate CRM records in CRM destination component by using Create or Delete action
Here are some more details about the component along with some screen shots.

Overview
SSIS Integration Toolkit for Microsoft Dynamics CRM provides a cost-effective solution that helps integrate Microsoft Dynamics CRM with other data sources or applications.

SSIS Integration Toolkit takes advantage of the flexibility and power of Microsoft SQL Server Integration Services (SSIS) platform, which made it possible to integrate with virtually any application or data source that you may need to work with.

SSIS Integration Toolkit is extremely easy to use. It comes with the following three major components to help facilitate the integration development.
  • Microsoft Dynamics CRM Connection Manager
  • Microsoft Dynamics CRM Source Component
  • Microsoft Dynamics CRM Destination Component
The ultimate goal of the toolkit is to simplify the integration development work, so that you can spend more time focusing on resolving business issues. A data migration / integration development can be done as quickly as a few minutes, instead of weeks or months.

Microsoft Dynamics CRM Connection Manager

Microsoft Dynamics CRM Connection Manager allows you to setup a connection in SSIS so that it can used by Microsoft Dynamics CRM Source Component to retrieve data from Microsoft Dynamics CRM Server, or Microsoft Dynamics CRM Destination Component to write data to Microsoft Dynamics CRM server.

The connection manager offers the capability to connect to a Microsoft Dynamics CRM server which can be either version 2011 (including CRM Online) or 4.0. It supports both CRM 2011 SOAP endpoint and CRM SOAP 2007 Web Service interface.
Microsoft Dynamics CRM Connection Manager (TataSolutions SSIS Integration Toolkit)

CRM Connection Manager allows you to choose one of the following authentications based on how your CRM server is deployed or managed.
  • Active Directory (On-Premise)
  • Federated (On-Premise, Partner-hosted or Online Federation)
  • LiveId (CRM Online)
CRM Connection Manager - Authentication Type

Microsoft Dynamics CRM Source Component
Microsoft Dynamics CRM source component is a source component that you can use in SSIS data flow tasks, which allows you to read data from Microsoft Dynamics CRM Server.

Using Microsoft Dynamics CRM source component, you can pick a CRM entity to read data from, after a CRM connection has been chosen.
CRM Source Component - Entity.png

Microsoft Dynamics CRM source component also supports reading data from CRM server through using FetchXml queries.
CRM Source Component - FetchXml.png

When FetchXML option is used as the Source Type, CRM source component can intelligently identify all fields and corresponding metadata including the fields from linked entities.
CRM Source Component - FetchXml Columns

When Entity option is used as the Source Type, Microsoft Dynamics CRM Source Component allows you to select the CRM fields that you want to obtain data, which makes it easy when you have a large number of fields in CRM system, but you only need a small number of them to be used in the downstream pipeline components.
CRM Source Component - Choosing CRM Fields

Microsoft Dynamics CRM Destination Component

Microsoft Dynamics CRM destination component is a destination component that you can use in SSIS data flow tasks, so that you can write data to Microsoft Dynamics CRM Server.
Using Microsoft Dynamics CRM destination component, you can choose a CRM entity to write data to, and the action of such operation, which could be Create, Update, Delete or Upsert.
CRM Destination Component

CRM Destination Component can be smart enough to automatically map all available input columns from upstream components to corresponding CRM fields based on their names, and it also allows to change such mapping using a dropdown list.
CRM Destination Component - Column Mapping

CRM destination component supports CRM many-to-many relationship entities, in which case, you can use Create action to create associations, use Delete action to disassociate them.

CRM destination component supports upsert action, in which case, the component will first try to check if the provided CRM record exists in CRM system, the component will only create a new record if the matching record doesn't exist. If the component has identified any existing records based on the matching criteria provided, it will update the matching records.

CRM destination component's upsert action can use the following three matching criteria.
  1. Primary Key
  2. CRM Duplicate Detection
  3. Manually Specified Fields
CRM Destination Component - Upsert Action

For Create and Update action, CRM destination component allows you to choose "Enable CRM Duplication Detection" option.

When writing data to Microsoft Dynamics CRM, dealing with picklist / optionset imposes quite some challenges since CRM can only take integer numbers for them. Microsoft Dynamics CRM destination component has made this significantly easy, for any picklist / optionset fields (including statecode and statuscode fields), you can use either internal integer values, or their string values (user localized labels).

That's All
For more details about the offering, please proceed to my company's website at http://www.kingswaysoft.com.

Please give it a try, and let us know how it goes.

A free trial license can be requested after the installation using the accompanied License Manager program.

Hope you like this offering.