Friday, December 16, 2011

MSCRM 2011: Two Errors When Using CRM Developer Toolkit to Deploy Workflow Library

While I was trying to develop a custom workflow library using CRM developer toolkit, I run into the following two errors (actually one at a time, but I am trying to keep the long story short).
Error registering plugins and/or workflows. A validation error occurred. The value of 'isolationmode' on record of type 'pluginassembly' is outside the valid range.
Error registering plugins and/or workflows. Description name must be specified
Parameter name: description
The solution is rather simple. What you need to do is to open RegisterFile.crmregister file (which is essentially an XML file) under CrmPackage project, and make some changes to the file in order to provide enough information for the deployment.
  1. Locate the Solution line of the workflow library in the XML file, add an XML attribute called IsolationMode, and give it a value of "None", so the XML attribute will be IsolationMode="None". 
  2. Located WorkflowType line, and add an XML attribute called Description, and give it a value which is meaningful. 
The following is the screen shot of the file before the change.

After the fixes, the file should look like this.
After you have made the above changes, you should be able to deploy your CRM workflow library in Visual Studio without problem.
Hope this helps if you ever run into the same issue.

Friday, December 02, 2011

MSCRM 2011: Filtered Lookup for "Add Existing..." Button of a CRM N:N View

I have previously documented a way to add lookup filtering capability to MSCRM4 "Add Existing..." button in a CRM N:N view. There was a question in the blog post today about whether this is possible in CRM 2011. So here is this blog post that will walk you through the implementation process.

Prerequisites

To go through the customizations in this blog post, you need to understand how CRM ribbon customization works, and also you need to know how to work with CRM Web Resources and solution export/import functionalities. It should also be noted that this blog post uses CRM Developer Toolkit. In case you are not familiar with the toolkit, you can have a look at my another blog post that illustrates some typical development scenarios which you might find useful. This blog post might be able to demonstrate you how the toolkit can help improve your productivity when developing CRM scripts.

Business Scenario

Let's say we have a custom entity called Project, which has a many-to-many relationship to CRM account entity. In Project entity form, I added a sub-grid which points to account entity, as shown below.


In the above screen, we have a Add Existing Button when the sub-grid is selected. When the button is clicked, we will be prompted the lookup entity's default Lookup View, as shown below.


What we are trying to achieve is to add some filtering capability to the "Add Existing ..." button so CRM only shows the account records that we are interested.

Let's get started.


Steps

Step 1: Create CRM JavaScript Web Resources

  1. In Visual Studio 2010, create a CRM project. (Please refer to the blog post that I just mentioned for detailed instructions about how to do this)
  2. In CrmPackage project, right-click WebResouces –> Script (JScript), and choose "Add" –> "New Item" to create a new JavaScript file. Let's call the file Project.js.


  3. Add the following script to the JS file (I borrowed the fetchXml and layoutXml combination from SDK document).
    function addExistingFromSubGridCustom(params) {
    
        var relName = params.gridControl.getParameter("relName"),
            roleOrd = params.gridControl.getParameter("roleOrd"),
            viewId = "{00000000-0000-0000-0000-000000000001}"; // a dummy view ID
        
        var customView = {
            fetchXml: params.fetchXml,
            id: viewId, 
            layoutXml: params.layoutXml,
            name: "Filtered Lookup View",
            recordType: params.gridTypeCode,
            Type: 0
        };
    
        var lookupItems = LookupObjects(null, "multi", params.gridTypeCode, 0, null, "", null, null, null, null, null, null, viewId, [customView]);
        if (lookupItems && lookupItems.items.length > 0) {
            AssociateObjects(crmFormSubmit.crmFormSubmitObjectType.value, crmFormSubmit.crmFormSubmitId.value, params.gridTypeCode, lookupItems, IsNull(roleOrd) || roleOrd == 2, "", relName);
        }
    }
    
    function addExistingFromSubGridAccount(gridTypeCode, gridControl) {
        addExistingFromSubGridCustom({
            gridTypeCode: gridTypeCode,
            gridControl: gridControl,
            fetchXml: "<fetch version='1.0' " +
                           "output-format='xml-platform' " +
                           "mapping='logical'>" +
                       "<entity name='account'>" +
                       "<attribute name='name' />" +
                       "<attribute name='address1_city' />" +
                       "<order attribute='name' " +
                               "descending='false' />" +
                       "<filter type='and'>" +
                           "<condition attribute='ownerid' " +
                                       "operator='eq-userid' />" +
                           "<condition attribute='statecode' " +
                                       "operator='eq' " +
                                       "value='0' />" +
                       "</filter>" +
                       "<attribute name='primarycontactid' />" +
                       "<attribute name='telephone1' />" +
                       "<attribute name='accountid' />" +
                       "<link-entity alias='accountprimarycontactidcontactcontactid' " +
                                       "name='contact' " +
                                       "from='contactid' " +
                                       "to='primarycontactid' " +
                                       "link-type='outer' " +
                                       "visible='false'>" +
                           "<attribute name='emailaddress1' />" +
                       "</link-entity>" +
                       "</entity>" +
                   "</fetch>",
            layoutXml: "<grid name='resultset' " +
                                 "object='1' " +
                                 "jump='name' " +
                                 "select='1' " +
                                 "icon='1' " +
                                 "preview='1'>" +
                             "<row name='result' " +
                                  "id='accountid'>" +
                               "<cell name='name' " +
                                     "width='300' />" +
                               "<cell name='telephone1' " +
                                     "width='100' />" +
                               "<cell name='address1_city' " +
                                     "width='100' />" +
                               "<cell name='primarycontactid' " +
                                     "width='150' />" +
                               "<cell name='accountprimarycontactidcontactcontactid.emailaddress1' " +
                                     "width='150' " +
                                     "disableSorting='1' />" +
                             "</row>" +
                           "</grid>"
    
        });
    }
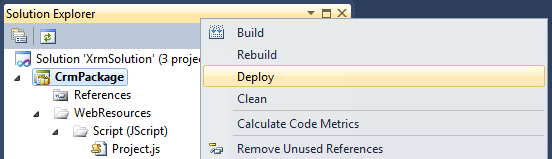
  4. After the script has been saved, you can right click CrmPackage project in Visual Studio Solution Explorer window, and choose "Deploy" to deploy the script to CRM Server. In our case, we will have a Web Resource in CRM called new_Project.

Step 2: Customize CRM Ribbon to Hook up the JS Function

  1. In CRM, create a new solution, and add account entity (the entity in the sub-grid) to the solution.
  2. Export the solution to a .zip file, and extract the file somewhere in your local file system.
  3. Open the customizations.xml from the extracted file, and locate RibbonDiffXml section in the file, under the account entity.


          <RibbonDiffXml>
            <CustomActions />
            <Templates>
              <RibbonTemplates Id="Mscrm.Templates"></RibbonTemplates>
            </Templates>
            <CommandDefinitions />
            <RuleDefinitions>
              <TabDisplayRules />
              <DisplayRules />
              <EnableRules />
            </RuleDefinitions>
            <LocLabels />
          </RibbonDiffXml>
  4. What we need to change is the CommandDefinitions part, which we can get the template code from applicationribbon.xml file (or <entityname>ribbon.xml if it's a system entity) in CRM SDK's resources\exportedribbonxml folder. 
  5. In applicationribbon.xml file (or <entityname>ribbon.xml), locate <CommandDefinition Id="Mscrm.AddExistingRecordFromSubGridAssociated"> line (You can search by addExistingFromSubGridAssociated to get there).
  6. Copy the xml content under <CommandDefinition Id="Mscrm.AddExistingRecordFromSubGridAssociated"> (including itself and its closing tag as well) to the customizations.xml file, so it should look like this.
  7. Modify the JavaScriptFunction part to point to the custom JS function that we previously developed, so it should be something like this:


    The following is the final customization xml.
      <CommandDefinition Id="Mscrm.AddExistingRecordFromSubGridAssociated">
        <EnableRules>
          <EnableRule Id="Mscrm.AppendPrimary" />
          <EnableRule Id="Mscrm.AppendToPrimary" />
          <EnableRule Id="Mscrm.EntityFormIsEnabled" />
        </EnableRules>
        <DisplayRules>
          <DisplayRule Id="Mscrm.AddExisting" />
          <DisplayRule Id="Mscrm.ShowForManyToManyGrids" />
          <DisplayRule Id="Mscrm.AppendPrimary" />
          <DisplayRule Id="Mscrm.AppendToPrimary" />
          <DisplayRule Id="Mscrm.AppendSelected" />
          <DisplayRule Id="Mscrm.AppendToSelected" />
          <DisplayRule Id="Mscrm.CanWriteSelected" />
        </DisplayRules>
        <Actions>
          <JavaScriptFunction FunctionName="addExistingFromSubGridAccount" Library="$webresource:new_Project">
            <CrmParameter Value="SelectedEntityTypeCode" />
            <CrmParameter Value="SelectedControl" />
          </JavaScriptFunction>
        </Actions>
      </CommandDefinition>
    Note that your JS webresource name could be in different format. You can find out that by openning the web resource in CRM, which tells you the path to the web resource file.

  8. Save the file, and zip it back to the original solution export file.
  9. Import the solution file, and publish changes. If everything goes OK, you will see a filtered lookup like the following.

Final Notes

  1. This is an unsupported customization, since we are using undocumented CRM built-in JS functions.
  2. addExistingFromSubGridCustom function is a re-usable function which is what you really need. addExistingFromSubGridAccount function is the actual one that's going to be called in your ribbon command button's customization.
  3. The filter that I have implemented didn't use any context information (such a field value) on the CRM form, you can easily add this in the function when constructing the fetchXml string, if desired.
  4. The above change will apply to all account subgrid regardless of the hosting entity. It should be possible to handle it differently by getting some context information from the form, or probably pass some extra information to the function.
  5. The code didn't have much comments, but hopefully the sample has provided enough information for you to start with.
By the way, an off-topic note, this blog has just reached 100K page views today. It took almost two years to reach 50K pageviews last time, but it only takes a few months to reach another one, although I don't currently produce as many posts as I did in the beginning of my blogging adventure. Good to see the growth of the CRM community.

Hope this helps.

Thursday, November 03, 2011

Add Visual Ribbon Editor to Your CRM Toolbox

Working with CRM ribbon customization could be a very challenging job due to its complexity and the vast options that the CRM platform offers.

Tools BagErik Pool has recently released a tool called Visual Ribbon Editor, which I believe you can now add to your toolbox to make yourself a proud and productive CRM developer. 

Enough though I am not practically working on CRM customizations on a day-to-day basis at this moment, I can tell the tool is sophisticated enough to help you conduct your ribbon customization work in a productive way.

Using the tool, you don't have to do all the wild guess about what you can do with your CRM ribbons. You can now instantly add, remove ribbon button and button groups, apply Display and Enabled rules based on your business requirements through its visual interface.

The following is a screen shot that I have copied from Erik's blog post.
CRM Visual Ribbon Editor
Check out the tool, I believe this is the only CRM ribbon customization tool you will ever need.

Hope this helps.

Wednesday, November 02, 2011

White Paper - CRM Solution Deployment Released

Microsoft Dynamics CRM team has just released another white paper yesterday which covers some typical issues that you may encounter when developing, deploying CRM solutions, the whitepaper has also described some best practices that you can leverage when developing your solution components and promoting the changes across environments.

The following is a brief list of the contents of the whitepaper.

Preface
Introduction
Maintaining Test Environments
    Testing Microsoft Dynamics CRM 2011 On-Premises Deployments 
    Testing Microsoft Dynamics CRM Online Deployments
        Managing Configuration 
        Managing Data 
        Using Microsoft Dynamics CRM Online Trials
Managing Solution Component Dependencies
    Addressing Execution Identity Issues 
        Plug-ins
        Workflows
    Addressing Workflow Reference Issues 
    Automating the Creation of Users, Teams, and Business Units 
        Creating Business Units and Teams
        Creating Users
    Automating the Creation of Queues 
    Preparing Configuration Data
    Preparing Solution Reference Data 
Upgrading Solutions
Managing Solution Conflicts 
Deploying Solutions
Conclusion

The whitepaper can be downloaded from the Microsoft Download Center at the following link.
The whitepaper has a lot of valuable information about CRM 2011 solution framework, it's an important guideline document that you should check out.

It should be noted that CRM team has given the whitepaper an interesting name which is extremely long, but what has been discussed in the whitepaper is really about solution deployment.

Hope this help.

Wednesday, October 26, 2011

CRM Developer Toolkit is Now Officially v1.0

Along with the latest version of CRM SDK (v5.0.7) released today, Microsoft Dynamics CRM team has released the first official version of CRM Developer Toolkit.

After a rough 10 minutes play, I haven't noticed much difference from the beta version that was released about 3 months ago. But one nice thing is now we can use integrated authentication when connecting to CRM server.
[UPDATE - Nov 2, 2011] According to CRM SDK team,one significant change from the beta developer toolkit is the XAML workflow activity project type.
CRM Developer Toolkit - Connection
The toolkit is accompanied by a readme file, which you should check out. It described some common issues when working with the toolkit. Here are some of the issues that you may encounter and the workarounds that are currently available (Some typos were fixed from the original file).
Visual Basic .NET is not supported (131574)
The Developer Toolkit does not support VB.NET.

No upgrade path for projects created with the Microsoft Dynamics CRM 4.0 Developers Toolkit (121629)
The Microsoft Dynamics CRM Developer’s Toolkit for CRM 4.0, which provided a sample project and integration with Visual Studio, was released in April 2009 on MSDN Code Gallery.
The Developer Toolkit for CRM 2011 has been completely re-written to support native Visual Studio development practices and project templates, to be less dependent on MSBuild, and to improve deployment support for new Microsoft Dynamics CRM development paradigms, including Microsoft Dynamics CRM Solutions and Web Resources.

Sporadic "Object Reference not set to an instance of an object" errors when using the CRM Explorer (138780)
Issue: When using the CRM Explorer "Object Reference not set to an instance of an object" errors occur sporadically.
Workaround: If you encounter this error while performing an operation, refresh the organization tree and try the operation again.

Invalid Project templates for CRM WorkflowLibrary (138374)
Issue: After installing the CRM Developer Toolkit, when you create a new project, below the Installed Templates for Visual C# you will see a CRM Workflow Library group containing a number of CRM Workflow Library project templates.

Workaround: Do not use these project templates.

When an error occurs while deploying a solution, other solution components will not be deployed. (126277)
Any solution components deployed before the error occurs will succeed and will not be rolled back after the error occurs. Any solution components that were not deployed before the error will not be deployed.

Solution components are added to default solution, if specified unmanaged solution is deleted. (126536)
If you configure your Visual Studio solution to connect to a specific unmanaged solution and that solution is later deleted, the solution components will still be deployed to the default solution.

The RegisterFile.crmregister must be manually edited after a generated class is deleted (139890)
Issue: If you attempt to deploy a solution after deleting a class generated for a plugin or workflow you will see the following error:
Error registering plugins and/or workflows. Plug-in assembly does not contain the required types or assembly content cannot be updated. 
Workaround: Open the RegisterFile.crmregister file to remove the <Plugin>,<WorkflowType>, or <XamlWorkflowType> node where the TypeName attribute specifies the fully qualified name of the class that was deleted.

Invalid error message following any other error when adding a web resource (135124)
When a validation error occurs due to a problem adding a web resource the following error message will follow it:
The selected file is not a valid type of web resource 
For example, when adding a web resource with the same name as an existing web resource you will get the expected error "A file with this name already exists. Please give it a unique name." but after clicking OK to close that error you will also get the invalid error incorrectly indicating that the file is not a valid type of web resource.

RegisterSchema.xsd uses enumeration values for specifying the stage of a plug-in step that are inconsistent or misleading. (136101)
Issue: For the <Step> elements within the RegisterFile.crmregister the enumeration defining valid values used by the Stage attribute do not match those used by the Plugin Registration Tool. The following table shows how the equivilent values used in the Plugin Registration tool:

RegisterFile.crmregister values Plugin Registration Tool values
PreOutsideTransaction PreValidation
PreInsideTransaction PreOperation
PostOutsideTransaction PostOperation

The enumeration value PostOutsideTransaction is misleading. PostInsideTransaction would be a more accurate because this represents Stage 40. See Event Execution Pipeline : Pipeline Stages for more information.

Duplicate file extensions added when existing web resources are added to project(138384)
Issue: When adding web resources from another solution to the current project in the Developer Toolkit using the Add to Packaging Project command in the CRM Explorer, the web resource files are added to the packaging project and a corresponding file extension is added to the name of the file. For example, an existing web resource named filename.js will be filename.js.js. This has no effect on the behavior of the web resource because the unique name used by the web resource is not necessarily the same as the file name.

Workaround: You can re-name the file used in the packaging project to remove the duplicate file extension.

Error building solution that includes XAML Workflow projects (139788)
Issue: By default the reference to System.Runtime.Serialization is not included in XAML Workflow projects. If you do not add this reference an error will occur when you attempt to build the project.

Workaround: Add a reference to System.Runtime.Serialization to any XAML Workflow projects you add.

Solutions drop-down displays managed solutions (136003)
Issue: When you connect to the Microsoft CRM Server and select and organization you have the option to select a solution. The solutions listed may include managed solutions. If you choose a managed solution when you later try to deploy your solution the following error may occur:

Error registering plugins and/or workflows. The PluginAssembly entity or component has attempted to transition from an invalid state: ComponentStateName: None; ComponentOperation: Create; ComponentSolutionType: Solution; SolutionOperationContext: None; IsProtected: True; IsBeingPublished: True.

Workaround: When you choose a solution be sure to choose an unmanaged solution.
It should be noted that the help file is now part of the entire SDK .chm file.

I have previously blogged about some typical development scenarios using the toolkit, you may want to check out if you are interested.

Hope this helps.

Thursday, October 06, 2011

Back to the Field, Offering MSCRM Training and Other Services

After spending the last 6 months working on something which was totally not relevant to Microsoft Dynamics CRM, I am pleased to announce that I am now back to the CRM field again.

For this time being, I will be an independent consultant on myself offering full-lifecycle MSCRM consulting services including architecture design, development, consultation, application support/maintenance, training, and etc.

To get the business started, I am currently offering the following 3 MSCRM training services.
  • Microsoft Dynamics CRM 2011 Boot Camp - Application and Customization
  • Microsoft Dynamics CRM 2011 Boot Camp - Development Crash Course
  • Microsoft Dynamics CRM 2011 Boot Camp - Installation and Deployment
Out of the 3 training courses, I want to highlight the development one. This development boot camp is designed to sharpen your CRM development skills and techniques through an intensive 5-day training courses. The training will include some extensive development exercises, practical hand-on labs in order to help you become familiar with CRM programming models, tools, utilities, and SDKs. It's expected that after the training you will be practically comfortable developing, and designing solutions on top of Microsoft Dynamics CRM platform. If you are serious about being a professional MSCRM developers in your career, this training is for you.

It should be noted that our services offerings are flexible per your business needs. The training services can be tailored to your specific requirements as well.