Prerequisites
To go through the customizations in this blog post, you need to understand how CRM ribbon customization works, and also you need to know how to work with CRM Web Resources and solution export/import functionalities. It should also be noted that this blog post uses CRM Developer Toolkit. In case you are not familiar with the toolkit, you can have a look at my another blog post that illustrates some typical development scenarios which you might find useful. This blog post might be able to demonstrate you how the toolkit can help improve your productivity when developing CRM scripts.Business Scenario
Let's say we have a custom entity called Project, which has a many-to-many relationship to CRM account entity. In Project entity form, I added a sub-grid which points to account entity, as shown below.
In the above screen, we have a Add Existing Button when the sub-grid is selected. When the button is clicked, we will be prompted the lookup entity's default Lookup View, as shown below.

What we are trying to achieve is to add some filtering capability to the "Add Existing ..." button so CRM only shows the account records that we are interested.
Let's get started.
Steps
Step 1: Create CRM JavaScript Web Resources
- In Visual Studio 2010, create a CRM project. (Please refer to the blog post that I just mentioned for detailed instructions about how to do this)
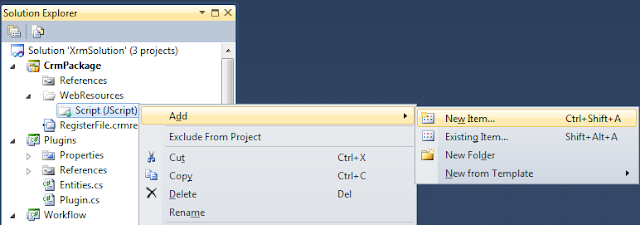
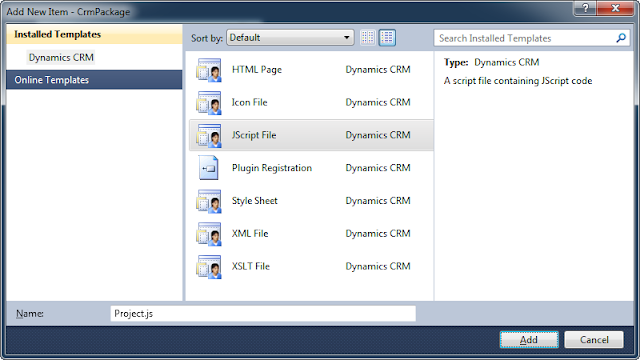
- In CrmPackage project, right-click WebResouces –> Script (JScript), and choose "Add" –> "New Item" to create a new JavaScript file. Let's call the file Project.js.
- Add the following script to the JS file (I borrowed the fetchXml and layoutXml combination from SDK document).
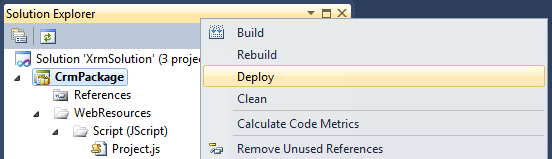
function addExistingFromSubGridCustom(params) { var relName = params.gridControl.getParameter("relName"), roleOrd = params.gridControl.getParameter("roleOrd"), viewId = "{00000000-0000-0000-0000-000000000001}"; // a dummy view ID var customView = { fetchXml: params.fetchXml, id: viewId, layoutXml: params.layoutXml, name: "Filtered Lookup View", recordType: params.gridTypeCode, Type: 0 }; var lookupItems = LookupObjects(null, "multi", params.gridTypeCode, 0, null, "", null, null, null, null, null, null, viewId, [customView]); if (lookupItems && lookupItems.items.length > 0) { AssociateObjects(crmFormSubmit.crmFormSubmitObjectType.value, crmFormSubmit.crmFormSubmitId.value, params.gridTypeCode, lookupItems, IsNull(roleOrd) || roleOrd == 2, "", relName); } } function addExistingFromSubGridAccount(gridTypeCode, gridControl) { addExistingFromSubGridCustom({ gridTypeCode: gridTypeCode, gridControl: gridControl, fetchXml: "<fetch version='1.0' " + "output-format='xml-platform' " + "mapping='logical'>" + "<entity name='account'>" + "<attribute name='name' />" + "<attribute name='address1_city' />" + "<order attribute='name' " + "descending='false' />" + "<filter type='and'>" + "<condition attribute='ownerid' " + "operator='eq-userid' />" + "<condition attribute='statecode' " + "operator='eq' " + "value='0' />" + "</filter>" + "<attribute name='primarycontactid' />" + "<attribute name='telephone1' />" + "<attribute name='accountid' />" + "<link-entity alias='accountprimarycontactidcontactcontactid' " + "name='contact' " + "from='contactid' " + "to='primarycontactid' " + "link-type='outer' " + "visible='false'>" + "<attribute name='emailaddress1' />" + "</link-entity>" + "</entity>" + "</fetch>", layoutXml: "<grid name='resultset' " + "object='1' " + "jump='name' " + "select='1' " + "icon='1' " + "preview='1'>" + "<row name='result' " + "id='accountid'>" + "<cell name='name' " + "width='300' />" + "<cell name='telephone1' " + "width='100' />" + "<cell name='address1_city' " + "width='100' />" + "<cell name='primarycontactid' " + "width='150' />" + "<cell name='accountprimarycontactidcontactcontactid.emailaddress1' " + "width='150' " + "disableSorting='1' />" + "</row>" + "</grid>" }); } - After the script has been saved, you can right click CrmPackage project in Visual Studio Solution Explorer window, and choose "Deploy" to deploy the script to CRM Server. In our case, we will have a Web Resource in CRM called new_Project.


Step 2: Customize CRM Ribbon to Hook up the JS Function
- In CRM, create a new solution, and add account entity (the entity in the sub-grid) to the solution.
- Export the solution to a .zip file, and extract the file somewhere in your local file system.
- Open the customizations.xml from the extracted file, and locate RibbonDiffXml section in the file, under the account entity.
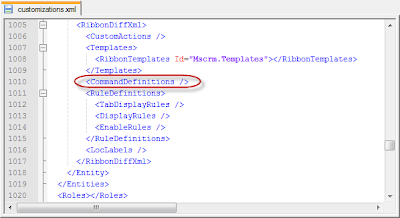
<RibbonDiffXml> <CustomActions /> <Templates> <RibbonTemplates Id="Mscrm.Templates"></RibbonTemplates> </Templates> <CommandDefinitions /> <RuleDefinitions> <TabDisplayRules /> <DisplayRules /> <EnableRules /> </RuleDefinitions> <LocLabels /> </RibbonDiffXml> - What we need to change is the CommandDefinitions part, which we can get the template code from applicationribbon.xml file (or <entityname>ribbon.xml if it's a system entity) in CRM SDK's resources\exportedribbonxml folder.
- In applicationribbon.xml file (or <entityname>ribbon.xml), locate <CommandDefinition Id="Mscrm.AddExistingRecordFromSubGridAssociated"> line (You can search by addExistingFromSubGridAssociated to get there).
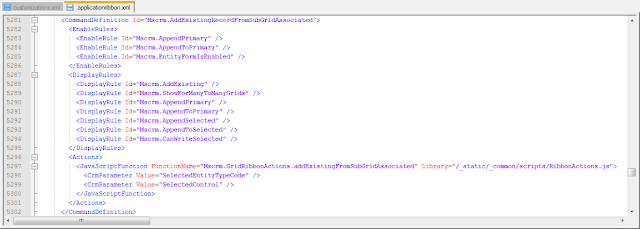
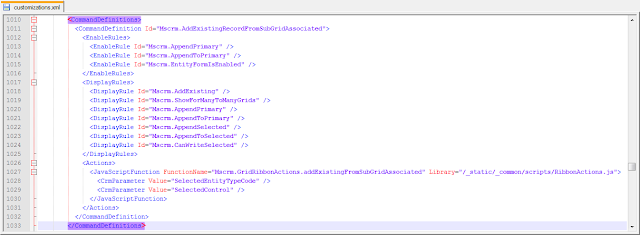
- Copy the xml content under <CommandDefinition Id="Mscrm.AddExistingRecordFromSubGridAssociated"> (including itself and its closing tag as well) to the customizations.xml file, so it should look like this.
- Modify the JavaScriptFunction part to point to the custom JS function that we previously developed, so it should be something like this:
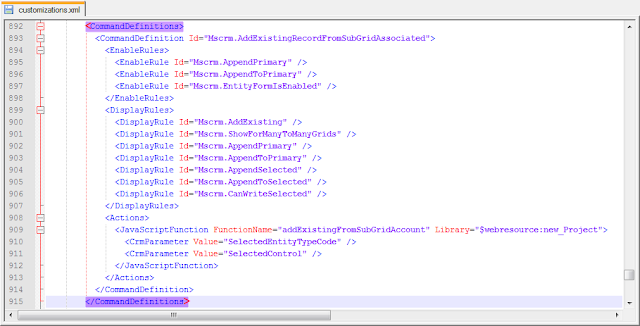
The following is the final customization xml.<CommandDefinition Id="Mscrm.AddExistingRecordFromSubGridAssociated"> <EnableRules> <EnableRule Id="Mscrm.AppendPrimary" /> <EnableRule Id="Mscrm.AppendToPrimary" /> <EnableRule Id="Mscrm.EntityFormIsEnabled" /> </EnableRules> <DisplayRules> <DisplayRule Id="Mscrm.AddExisting" /> <DisplayRule Id="Mscrm.ShowForManyToManyGrids" /> <DisplayRule Id="Mscrm.AppendPrimary" /> <DisplayRule Id="Mscrm.AppendToPrimary" /> <DisplayRule Id="Mscrm.AppendSelected" /> <DisplayRule Id="Mscrm.AppendToSelected" /> <DisplayRule Id="Mscrm.CanWriteSelected" /> </DisplayRules> <Actions> <JavaScriptFunction FunctionName="addExistingFromSubGridAccount" Library="$webresource:new_Project"> <CrmParameter Value="SelectedEntityTypeCode" /> <CrmParameter Value="SelectedControl" /> </JavaScriptFunction> </Actions> </CommandDefinition>Note that your JS webresource name could be in different format. You can find out that by openning the web resource in CRM, which tells you the path to the web resource file. - Save the file, and zip it back to the original solution export file.
- Import the solution file, and publish changes. If everything goes OK, you will see a filtered lookup like the following.


Final Notes
- This is an unsupported customization, since we are using undocumented CRM built-in JS functions.
- addExistingFromSubGridCustom function is a re-usable function which is what you really need. addExistingFromSubGridAccount function is the actual one that's going to be called in your ribbon command button's customization.
- The filter that I have implemented didn't use any context information (such a field value) on the CRM form, you can easily add this in the function when constructing the fetchXml string, if desired.
- The above change will apply to all account subgrid regardless of the hosting entity. It should be possible to handle it differently by getting some context information from the form, or probably pass some extra information to the function.
- The code didn't have much comments, but hopefully the sample has provided enough information for you to start with.
Hope this helps.


Great Post. This is going to be really helpful for those CRM developers who are doing customization on daily base. Here,only thing I want to add is when you copy the 'CommandDefinition' part Xml file, make sure the 'Id' matches with the ribbon button Id(It could be Mscrm.AddExistingRecordFromSubGridAssociated or Mscrm.AddExistingRecordFromSubGridStandard),also the relationship could be one to many or many to many, so you might need to change or . Then you are good to go.
ReplyDeleteContinue my last comment, for whatever reason, the text I typed didn't show. I mean you need change to if the relationship is one to many.
ReplyDeleteThanks Jack for the info.
ReplyDeleteAs Jack has pointed out, when the relationship is one to many, the ribbon button ID should be Mscrm.AddExistingRecordFromSubGridStandard.
That's one thing. There is another thing I also want to point out is you also need to change the 'DisplayRule' from Id="ShowForManyToManyGrids" to Id="ShowForOneToManyGrids" when the relationship is changed. otherwise, it wouldn't work.
ReplyDeleteVery nice article Daniel. Thanks for sharing!
ReplyDeleteThanks Donna!
ReplyDeleteHello Sir,
ReplyDeleteThank u so much for Post, its truly helpful..
But I am not much familiar with Fetchxml,
I have three Custom Enitity (T,S,A)
T has 1:N relation with A
T has N:N relation with S
A has 1:N relation with S
I have forms for T which have lookup for A and subgrid for S,
When Add existing button of Subgrid is clicked it should show record as per selection of enity A(lookup)
so if user selects one of the Account(which is lookup) related S record show be shown in lookup of Add Existing button of Subgrid.
kindly need your help
@Sneha, you have to make yourself comfortable working with FetchXml, I consider it a key skill to survive in CRM development practice. In case you don't know, when you create a CRM advanced find view, there is a ribbon button on the far right which allows you to download the FetchXml query. This seems to be the easiest way to create a FetchXml query. Actually learning FetchXml is not that hard, in fact, it's quite fun.
ReplyDeleteHope this helps.
thanks a lot sir...
ReplyDeleteI shall start it from today...
Great post....It worked for me. But I have a problem.
ReplyDeleteI want to display an attribute from a linked entity in the view. I was able to access that attribute in Fetch XML.
But I couldn't able to add that cell in Layout XML.
I tried by giving 'Alias' to the linked entity and access the attribute in Layout XML as 'alias.attribute', didn't work.
Can you please tell me how to do this?
Thank you.
@Sushma, I am not sure why it would happen to you. I will try to check if the aliases in FetchXML and LayoutXML are matched. In fact, I have shown the linked entity in my sample. You may be able to find some hints from my code.
DeleteHi Daniel,
ReplyDeletegreat article, but i did not get it to work in my case :-(
Can you help me?
I have 3 Entities. new_Event, new_Participant and productpricelevel
Between participant and productpricelevel i have an n:m relation. Between event and participang 1:n
Now i want to filter the productpricelevels on the pricelist saved on event.
In first step I just wrote a new view which displays all productpricelevels, to see if it is working - but no...
My Situation is a little bit different as you wrote. You added a Subgrid to the form - i dont have this. I have just the navigation on the left site. Is it possible to filter there?
Thanks in advance
Pascal
@Pascal, sorry for the late response.
ReplyDeleteWhat's the reason that you cannot use sub-grid?
Hi Daniel,
Deletei am a fool.I added you CommandDefinition on the wrong entity. It is working without sub-grids too!
Thanks
Pascal
Great code! I've tried using it and for many to many relationships it works great. However, when trying it on a one to many relationship I've encountered a strange error. I can get the lookup to be filtered, but as soon as I select an item the "Add" button gets greyed out. Anyone have any ideas on how to fix this issue?
ReplyDelete@Matt, that's strange, I am not aware of that issue. Do you happen to have customized the "Add" button?
Delete@Daniel : Yes, it is a customized button. The rules are all the same though. It is essentially a replica of the original add button except that it uses the function in your post and has a different Id. For the many to many relationships I used customized buttons as well and it worked fine on those. It is really a strange error and I'm stumped. I've tried a few different things ( all with no luck ) and am running out of ideas. Any help you can offer is greatly appreciated!!
Delete@Matt, I am not sure if I read you correctly. In this post, we are discussing the customization of "Add Existing..." button, did you happen to use the code for "Add" button? I might sound a little silly to ask this way, but I thought I should in case I miss anything in the communication.
Delete@Daniel : I customized the "Add Existing Standard" button. The "Add" button that gets greyed out is in the window that opens when you click the "Add Existing" button. I should mention that at first the "Add" button is clickable, but as soon as you click anywhere on the form it gets greyed out. I also just tried doing it on a non-customized add existing button and I get the same error. If need be I can post the code up here in a comment, but aside from the different fetchxml everything is pretty much if not exactly the same.
Delete@Matt, if the "Add" button doesn't work with no customization of the "Add Existing", then the problem is not relevant to the code from this post. It must be something else. Did you try a different rollup or a different environment? I recommend you post the problem with a bit more information on one of CRM forums.
Delete@Daniel : It is the most recent rollup, and it is an on-premise environment. I can try posting on those forums as well. What makes me think it is something with the code is that normally the "Add" button works. It just doesn't work when I use the code to filter the view.
Delete@Matt, I must have confused myself. I read that the "Add" button has the same problem when the "Add Existing" button is not customized.
Delete@Daniel : Ah, what I mean is that when I try the same code on a non-customized "Add Existing Standard" button I get the same error. But, if I leave the "Add Existing Standard" button alone with no filter code then I don't have the problem.
Delete@Matt, I am still not sure if I am following after reading your revised comment, it doesn't sound any different. It's probably just because English is my native language, please excuse me for that. However, I have just tested a 1:N relationship subgrid, I had no problem after customizing "Add Existing" button. Two things that you should probably have a second look.
Delete1. Make sure you are customizing the right button ID, which is Mscrm.AddExistingRecordFromSubGridStandard for 1:N subgrid
2. Make sure you have the right JavaScriptFunction name and Library name.
@Matt, I have the same problem did you find any solution ??
DeleteThanks
I had the same problem. Check your LayoutXml, I had a mistake in this part - "<grid name='resultset' " + "object='1' " + "jump='name' "
DeleteThis post saved my day. I just had to spend half an hour to achieve this by referring to your solution. Otherwise, I don't know how many hours will it take to find out.
ReplyDeleteThanks a lot, Daniel.........
How do you restrict user to select system view.
ReplyDeleteI want disable System view for N:N releationship subgrid Add existing button.
@sd, sorry for not noticing your request sooner. Please see my response below, but I am not exactly sure if that satisfies your requirement, since it disables the view selector, so only the filter view can be used.
DeleteBrilliant post Daniel!
ReplyDeleteI agree with the comment that this post is a huge time saver!
I am interested in filtering based on the value of lookup field, which is located on my main CRM form. For example, 'A' represents an opportunity, 'B' is custom entity lookup, 'A' has an N:1 relationship with 'B'. 'B' has a 1:N with custom entity 'C'. 'A' has a N:N with 'C'. Therefore, 'C' will display as the sub-grid inside the main form of 'A'. Steps - (1) I select the value for lookup 'B'. (2) then I click on my 'C' sub-grid to cause the ribbon relating to 'C' to appear. (3) Clicking on 'add existing' should result in 'C' getting filtered by 'B'.
My question is, inside the fetchXML, can I reference the value of 'B', by using the following?
var bValue = Xrm.Page.getAttribute("new_B").getValue();
Or, is there another way to reference the field?
Cheers!
Problem solved. I did not realize how important it was to insert the sub-grid. After having inserted the sub-grid, calling var bValue = Xrm.Page.getAttribute("new_B").getValue(); returns the value from the parent form relating to 'B'.
DeleteThanks for posting back with the update, it's good to know.
DeleteDaniel,
ReplyDeleteI am trying to assess to what extent this solution is, an unsupported customization.
In CRM 4.0, anything that was unsupported basically meant that it would not upgrade to CRM 2011. Does the same definition apply with this customization?
Or, is it unsupported because, as you say, because it is "using undocumented CRM built-in JS functions.?"
Cheers.
Both are true. Since we are using undocumented JS functions, Microsoft doesn't endorse any usage of undocumented API functions such as the one we are using. As such, they can change the function in anyway they want in the future version. My recommendation for unsupported changes is, document the changes, so you can re-visit them when you install new versions.
DeleteHi Daniel,
ReplyDeleteThanks!!This post helped me a lot .
But I am having one issue I want restrict user to select system View.
Is it possible to have custom view alone in Filtered lookup?
Thanks in Advance.
@Gouri, I haven't explored the option to do this. It might be possible, but I am not sure at this moment.
Delete@Gouri, if you change the LookupObjects line of code to the following one:
DeleteLookupObjects(null, "multi", params.gridTypeCode, 0, null, "", null, null, null, null, null, null, viewId, [customView], null, null, null, null, null, null, true);
It should disable view selector. Not sure if that's what you want, and I haven't actually verified it, but I believe it should work.
Hi Gouri,I have same issue about disabling system view; wondering if you have any success on ablve Daniel suggestion?
DeleteI tried but no success yet.
Thanks
Thank you but I followed everything in the post but it doesn't work because the function that is assigned to the add existing button is not being called when the button is clicked.
ReplyDeleteIn my scenario the N:N relation is between 2 custom entities, does that make any problem ?
Thank you
Custom entity is not the issue. If the function is not called when the button is clicked, it is most likely your ribbon customization is not in effect, or there is something wrong with your ribbon customization. Make sure you have published your customization.
DeleteThank you Daniel ,I'm sure that I published my new customization because I used the ribbon editor tool and noticed that the add existing button has the new javascipt function from the new library..!!
ReplyDeleteThis is the Ribbon Definition section , can you tell me if I miss anything ?
It seems that I can't post the xml as a comment !!
ReplyDelete:(
I'm sorry I was exporting the project entity instead of the account entity !!
ReplyDeleteAnd now it is working perfectly.
But I have a question if you can help me .
Can I disable the view selection to prevent the user to select any other views ??
Thank you.
@Zarour, if you read the response that I posted before your question, you will find the code that disable the view selector, although I haven't tested it myself.
Delete@Daniel Thanks for your help I really appreciate your help.
DeleteBut I have the same problem that Matt has which is the "Add" button on the lookup filtered form is getting disabled when I select any record so I can't add any record.
I have a N:N relation and customize the button of Id="Mscrm.AddExistingRecordFromSubGridAssociated"
It is really a strange problem :S.
Hi Daniel.
ReplyDeleteGreat Post.I followed it successfully. The filter is working fine. But when I select records from the view,add them and press Ok, the list doesn't get populated i.e, no records are added and the subgrid remains empty. I have added a custom button and using it on a man to many relationship subgrid.
Thanks
Haris
This comment has been removed by the author.
DeleteHi Daniel,
DeleteI debugged the script and found out that the following line is encountering the error
AssociateObjects(crmFormSubmit.crmFormSubmitObjectType.value,crmFormSubmit.crmFormSubmitId.value,params.gridTypeCode, lookupItems, IsNull(roleOrd) || roleOrd == 2, "", relName);
ERROR: crmFormSubmit is undefined.
Pls Help.
Thanks
@Haris,
DeleteI had the same problem. Try "parent.crmFormSubmit", works for me.
@Daniel, this post helped me a lot. Thanks!
Hi Rômulo, your solution works. But, the function AssociateObjects show a error message to User Interface. My parameters was: TypeCode1 (Primary Entity: Product), GUID Primary Entity (Product), TypeCode2 (Second Entity: Territory), Objects,..., Relationship_Name. The Relationship is N:N between product and territory. Can you help me? Please.
DeleteThis comment has been removed by the author.
DeleteHi Romulo, Thanks for the solution; it works.
Delete@Daniel, thanks for sharing such a greate post.
hi im having the same problem with the add selected. The filtering look fine but when i select the record to add. The add button grey out. My relation is one to many. Anyone get any idea on how to solve this problem ?
ReplyDelete@Grey button issue (Matt, Elson and so on!!)
ReplyDeleteI had the same problem as you all did, but solved it by changing a bit on my layoutXml. its kind of stupid :) But I just copied the hole down from one of these sites with out looking at the layoutXml which is like this:
"" +
"" +
This is complete wrong any my case, because I dont want to show account reccords but custom records instead.
My layoutXml looks like this now and works:
layoutXml: "" +
"" +
I'll make a redump of my hole solution on my blog:
http://crmdream.wordpress.com/
Hm I couldnt insert the layoutXml. But you need to change the object, to your entity object type code (Mine was 10002) and your id to the entity's ID (Mine was df_addressid)
ReplyDeleteThanks a ton Daniel,
ReplyDeleteThis helped me a lot.
Great post Daniel, this has been extremely helpful.
ReplyDeleteI've got everything working, but I'm struggling with one aspect.
I'm using these many to many related entites on 3 different entity types: contact, case, and a custom entity. I only want to do the filtering on case and the custom entity. When I do the filtering, I first have to grab the object ID from the form (Xrm.Page.data.entity.getId()) and I use this in my fetchXml, so If the code was hit from the associated left navigation, and not the in form subgrid, I don't want to do the filtering as well. Is there a way to call the LookupObjects(...) method without passing in a custom filter view, and have it render to the default Lookup view?
Thank you!
@Erik, I haven't tried myself, but in your case, you can try to take off the last two parameters when calling LookupObjects method, which should give you default lookup. However, this is just my speculation, hopefully it works for your purpose. All lookup functionality goes through LookupObjects method, so technically it is always possible, just one way or another.
DeleteHi Daniel,
ReplyDeleteExcellent Post, Everything working fine of me. But i have one problem. I have a update plugin whenever add item from Filtered custom view. This plugin call, when you update item in database. my plugin in post-operation plugin. Now my problem is, whenever i try to add an item my plugin through an infinite loop error. In my plugin coding i already checked infinite loop(if(context.depth>=2) then return;). When i add item, depth become 2, when i delete item depth become 1. So When i add my item its not processing my code. How to overcome this problem. Please give me a solution for this. Thank you.
@venkatesh, sorry for not being able to respond sooner. However, I am afraid that I don't understand your scenario good enough to provide any helpful suggestion. But I would try to debug the plugin code by setting a breakpoint before the context depth check. Can you do that and see if you can spot anything?
DeleteDaniel
Hi, I have added half of my plugin code below. In that I am getting context details from sdk and checking the depth. When i am using Custom View I am getting depth as 2. Now i checked without custom view, its working fine. But If you add custom view, Its getting Infinite loop. When I am using custom view, after selected the item database getting updated somewhere. I don't know why this hitting like this. I need custom view now, but this problem make me trouble. Please tell me what happen when I add item from custom view
Deletepublic void Execute(IServiceProvider serviceProvider)
{
NTW = new NumbersToWords();
CRMAccess = new CRMAccessLogic();
Entity entity = new Entity();
EntityReference ParentReference = new EntityReference();
try
{
#region Initialize Services & Objects
Microsoft.Xrm.Sdk.IPluginExecutionContext context = (Microsoft.Xrm.Sdk.IPluginExecutionContext)serviceProvider.GetService(typeof(Microsoft.Xrm.Sdk.IPluginExecutionContext));
tracingService = (ITracingService)serviceProvider.GetService(typeof(ITracingService));
serviceFactory = (IOrganizationServiceFactory)serviceProvider.GetService(typeof(IOrganizationServiceFactory));
service = serviceFactory.CreateOrganizationService(context.UserId);
#endregion
#region Check for Indefinite Loop
if (context.Depth >= 2)
{
return;
}
Hi Daniel,
ReplyDeleteI wanted to compare the sub grid records before and after linking one or more records. So in the addExistingSubgrid function I get the total records on start, ex. 2 , then using the lookup function we get a lookup dialog to choose one or more records to link, though after the Assoc fuction is run, I see the grid is refreshing hence we can't get the new recourd count of the sub grid at that point so I can't compare the before and after list of records in the subgrid. Is there any way this can be made possible ?
@hero, just started to catch up the comments here. I don't think I completely understand what you are trying to achieve. However, when the grid is refreshing, you would have to wait until the refresh finishes. You can use JavaScript setTimeout function to keep checking (at an artificial interval, such as every 200 or 500 milliseconds) to see if the grid refresh has completed, and do the counting only when the refresh has completed.
DeleteHi Daniel,
ReplyDeleteI followed your example and it worked like a charm. However, when I try to do filtered lookup on Add Existing Button of Account entity, the custom javascript never gets fired. Do you have any idea what might be the cause?
@theo, you might want to check your script to make sure you don't have any syntax error. Otherwise, there should be no reason that it doesn't work.
DeleteThanks,
Daniel
This comment has been removed by the author.
DeleteThis comment has been removed by the author.
ReplyDeleteHi,
ReplyDeleteErroring on 'param.gridControl.getParameter(...)'. Have debugged and the gridControl object doesn't contain either of the required parameters. Have edited the RibbonDiffXML to pass PrimaryControl and SelectedControl but same result with each.
I should note that I am running the web client with Roll Up 12, which may be the reason for the error
Thanks :)
Never mind, was a Roll Up 12 issue. See http://www.magnetismsolutions.com/blog/paulnieuwelaar/2013/02/04/filter-n-n-add-existing-lookup-dynamics-crm-2011-rollup-12
DeleteHi Daniel,
ReplyDeleteThanks for the post it helped me a lot
I have followed the above code and devloped my one. In my case it is working fine but if i use the same subgrid in different entity for example currently if have 3 entities A,B,C
The Above Filetring example works better for A-B
Relation Ship with A- B: N:N
Relation Ship with C- B: N:N
When it comes to C- B: It show me an realtionship name <> is not found metadatacachedetail:
I am not able to trace out this please can you suggest me any thing on this issue.
Hi Daniel,
ReplyDeleteI have a requirement of filtering subgrid to show records having same account id .Actually on SR entity form Policy subgrid is present where when I click on add 'Existing Policy' it should display policies having same account as SR.
Can u please provide the fetch XML condition for filtering to achieve this ?
this has worked well in CRM 2011, but it doesn't seem to fire in CRM 2013. Anyone else having issues with '13?
ReplyDeleteI followed your example. However, when I try to do filtered lookup on Add Existing Button of Account entity, the custom javascript never gets fired. Do you have any idea what might be the cause?
ReplyDeleteplease help, for crm 2015 ?
ReplyDelete